Wish Lists
Ultra Commerce Wish Lists are lists of items that account holders choose and appear on a wish list the list can be personal or for use by others. An example of a wish list would be a wedding registry where people can select items from the list and create an order.
These Wish Lists can be created in the Ultra Commerce Admin.
- Enable Site Filtering on Add Order Item Listing for Wish Lists (and Order Templates)
- Navigate to the Wish List listing Page
- Create a Wish List from the Wish List listing page
- View Wish Lists from an Account detail
Enable Site Filtering on Add Order Item Listing
Before creating Wish Lists or Order Templates there is a setting in the Ultra Commerce admin called Enable Site Filtering on Add Order Item Listing that needs to be set to Yes so that only items from the selected site display for selection both in the admin for when selecting for order items for the Wish List or the Order Template. This setting is found under Global Settings. Otherwise items from all sites will display for selection on the Wish List / Order Template detail page when creating a wish list or order template.
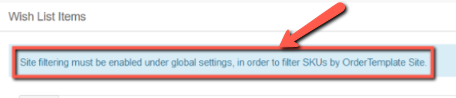
You will know if this setting has not been set yet because there will be a blue validation message alerting you that it has not been set on the Wish List / Order Template detail page. If it has been set, this message will not appear.
To Enable site Filtering on Add Order Item Listing:
From the Ultra Commerce tool bar:
- Select the Config icon
- Select Settings from the drop-down

From the Settings page:
- Click the Global Settings tab to expand it.

From the expanded Global Settings tab scroll to the bottom and find the
.png)
Enable Site Filtering on Add Order Item Listing - This setting controls the order items that appear on the Wish List detail page when items are being added to the wish list.
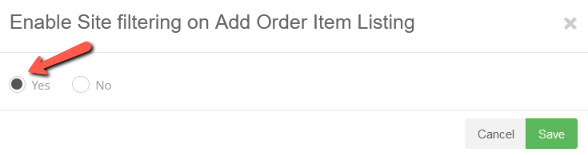
- Click the pencil icon to the right of the setting.
- Select Yes on the modal that appears.
- Click Save to save the setting.
Navigate to the Wish List listing page
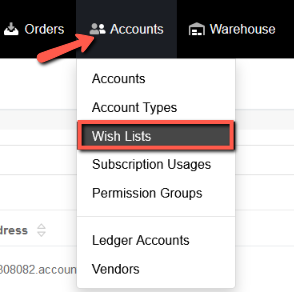
From the Ultra Commerce nav Bar:
- Select Accounts
- Select Wish Lists from the drop-down.
The Wish List listing page will display. From here you can view or edit previously created wish lists or create a new wish lists..png)
Create a Wish List
- Click the blue +Create Wish List button in the upper right hand corner of the page.
The Create Wish List modal will appear.
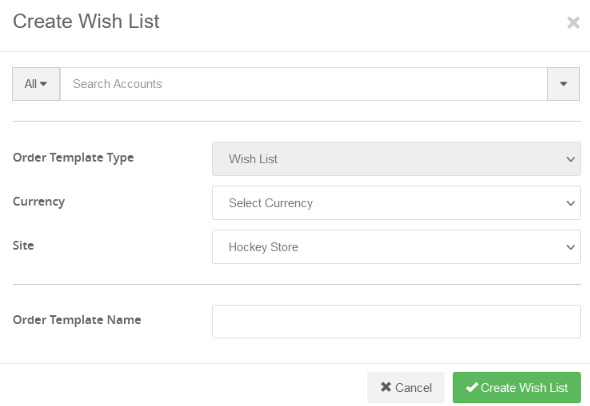
- Select the Account desired from the account search type-ahead.
- Order Template Type will be set to Wish List.
- Select the Currency for the Wish List.
- Select the Site for the Wish List - this will filter the items that will be available to choose.
- Add an Order Template Name
- Click Create Wish List.
The Wish List detail page will display.
As you can see in the image below, if Site Filtering has not been enabled order items from every site will appear for selection and there will be a blue validation message alerting you that it has not been set. See the Enable Site Filtering section above for details on how to set this. If it has been set, this message will not appear.
.png)
Now items need to be added to the Wish List.
- Put the detail screen into edit mode by clicking the pencil icon in the upper right hand of the detail page.
Now you will see order items for selection on the Wish List Items tab of the wish list detail page.
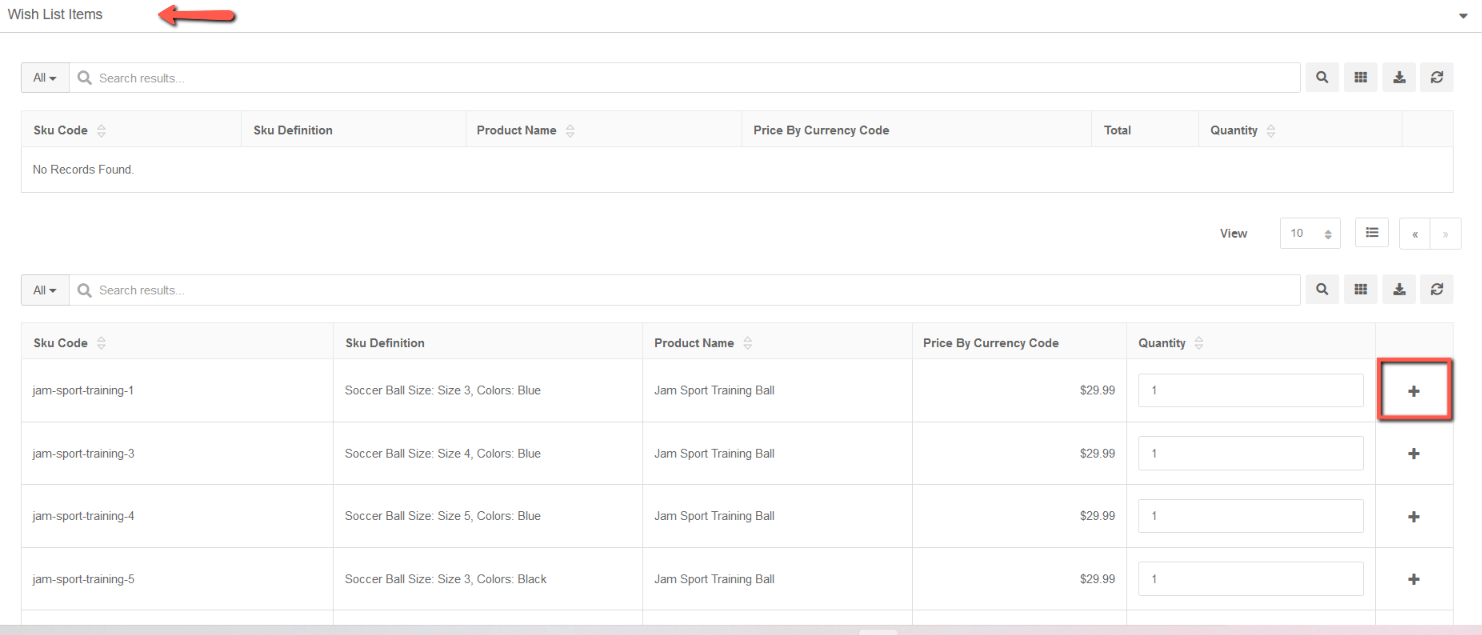
After finding the item(s) you would like to add to the wish list:
- Click the + icon to the right of the items you would like to add to the wish list.
- Save the Wish List by clicking the green Save button in the upper right hand corner of the detail screen.
The wish list will now have the items appear in the upper section of the Wish List items tab.

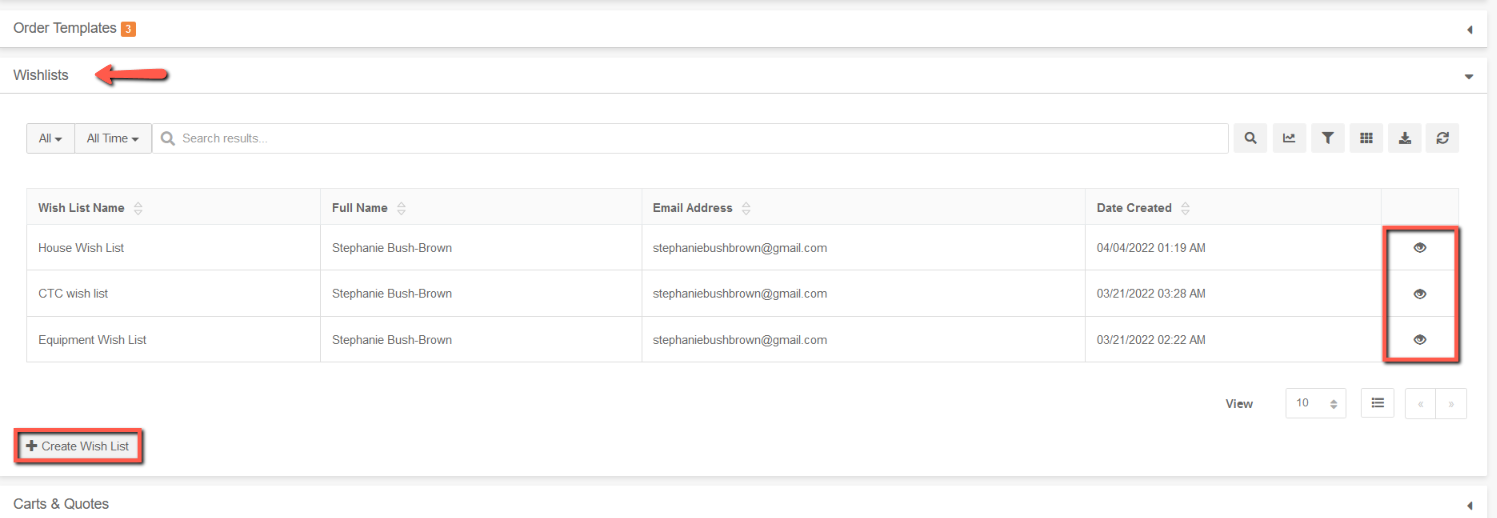
View Wish List(s) from an Account detail
You can also view / create Wish Lists from a specific Account detail page.
- Select Account from the Ultra Commerce toolbar.
- Select Accounts from the drop-down.
- Find the Account from the listing page and click the eye or pencil icon
- Find the Wish List tab and expand it.
On the Wish List tab is a listing of all Wish Lists created. You can view each Wish List detail page by clicking the eye icon to the right of the listing.
You also have the option to create another wish List by clicking blue + Create Wish List button.