Payment Methods
Ultra Commerce has multiple payment method types available for setup and use by individual or organizational Accounts on your site(s): Cash, Check, Credit Card, External, Gift card and Term Payment. You can set up these payment methods to work with the payment integrations that you currently use for your site and you can fine tune the use of payment methods by accounts at the Account, Site and Product Type levels.
- Navigate to the Payment Method Listing
- Set Up and Enable a new Payment Method
- Max Order Total Percentage Setting
- Enable/Restrict Payment Methods - Account and Site and Product Type levels
Navigate to the Payment Method Listing
The Payment Method Listing can be accessed by:
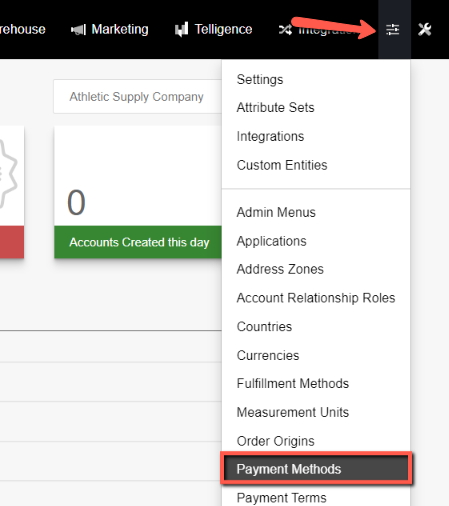
- Clicking the Config icon from the Ultra Commerce toolbar
- Selecting Payment Methods from the Config drop down.
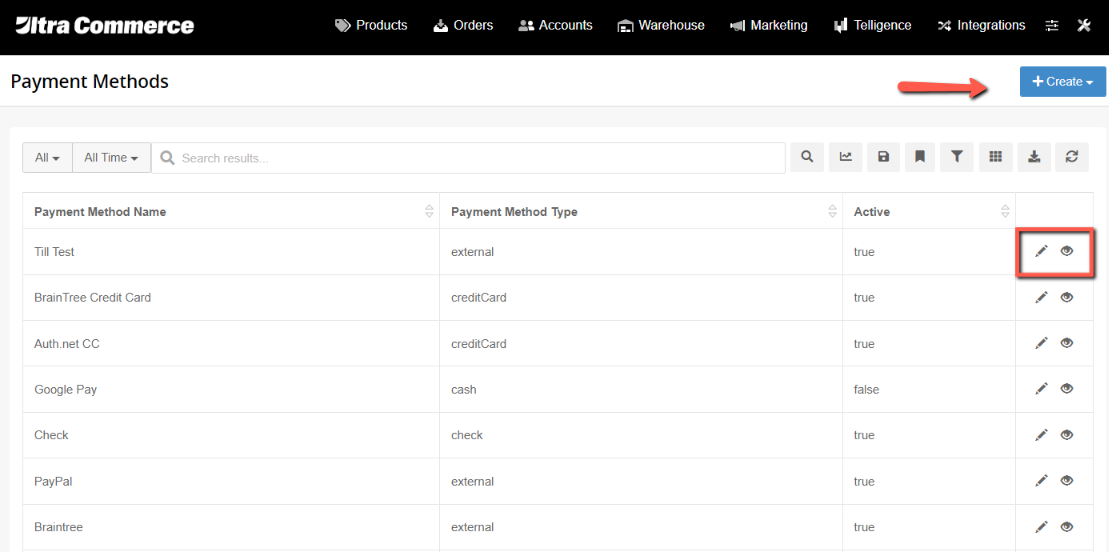
The Payment Methods listing page will appear. It displays all payment methods currently set up, their payment method type, and whether they are active and published for use on the site.
Set Up and Enable a New Payment Method
To set up a new Payment Method:
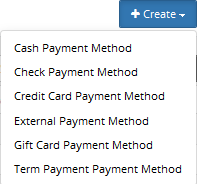
- Click + Create blue button.
- Select one of the Payment Method Types from the drop down: Cash, Check, Credit Card, External, Gift card or Term Payment
Set Up a Credit Card Payment Method
- Select Credit Card Payment Method from the drop down.
This will bring you to the Create Payment Method screen.
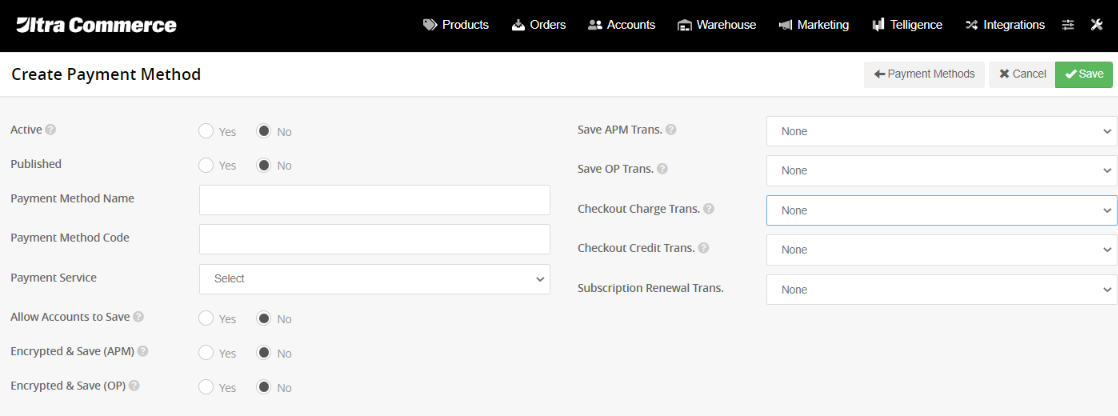
- Active - Yes or No. Set this to Yes when you are ready to activate the payment method for use.
- Published - Yes or No. Set this to Yes so that the payment method displays for use.
- Payment Method Name - Select a name for your payment method.
- Payment Method Code - Select a unique payment method code.
- Payment Service - choose a provider gateway from the available integrations.
- Allow Accounts to Save - Yes Or No - if you select Yes individuals/organizations could choose to store this payment method type to their account.
- Encrypted and Save (APM) - Yes or No - Selecting Yes for this option will store the secure payment information in an encrypted format when saving an Account Payment Method. It is not recommended as other options like generating tokens are typically better.
- Encrypted and Save (OP) - Yes or No - Selecting Yes for this option will store the secure payment information in an encrypted format when saving an Order Payment. It is not recommended as other options like generating tokens are typically better.
- Save APM Trans. - None or Generate Token -Typically used to generate tokens from the processor, which are then stored with the Account Payment Method to avoid encrypting and storing data.
- Save OP Trans. - None or Generate Token - Typically used to generate tokens from the processor which are then stored with the Order Payment to avoid encrypting and storing data.
- Checkout Charge Trans. - None, Generate Token, Authorize and Authorize and Charge are the options. This type of transaction will be run for all charge order payments when the order is placed. Authorize or None are commonly used when the customer is not to be charged until the order has shipped. These orders will be charged (and, if needed, authorized) at the point of fulfillment rather than of purchase.

- Checkout Credit Trans. - None, Generate Token and Credit are options. This type of transaction will be run for all credit order payments when the order is placed.
![]()
- Subscription Renewal Trans. - None, Authorize, and Authorize & Charge are the options for this transaction. This setting determines what happens for this payment method type when it is used for subscription renewals.
- Click Save.
*Note: once your payment method has been saved, you cannot change its type.
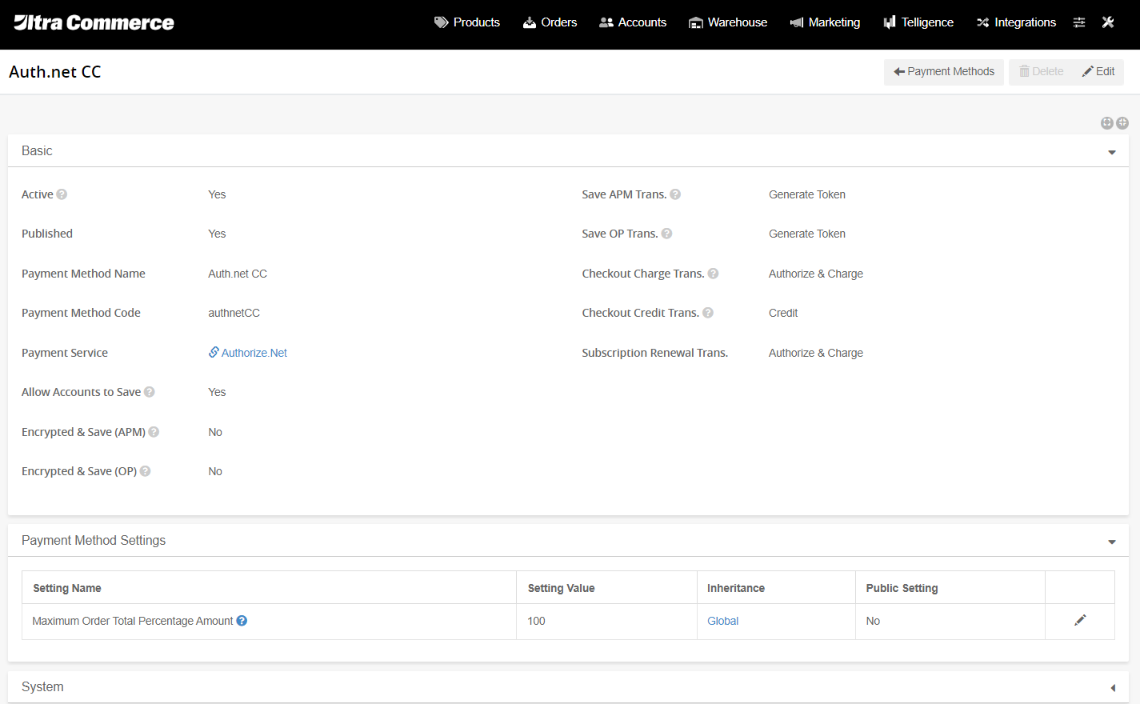
Once you save you will then see the Payment Method detail screen and the Payment Method Settings tab.
Payment Method Settings tab
Maximum Order Total Percentage Amount - This setting allows you to define the maximum order percentage of the total order amount for the payment method type. In general, for a credit card payment types this would be set to 100% allowing 100% of the order total to use the credit card payment type. However, for certain payment method types such as Term Payment method you may want a lesser than the full percentage amount such as 50% of the order total to be used with the term payment method.
Set Up Term Payment Payment Method
- Select Term Payment Payment Method from the drop down.
The Create Payment Method screen will appear.
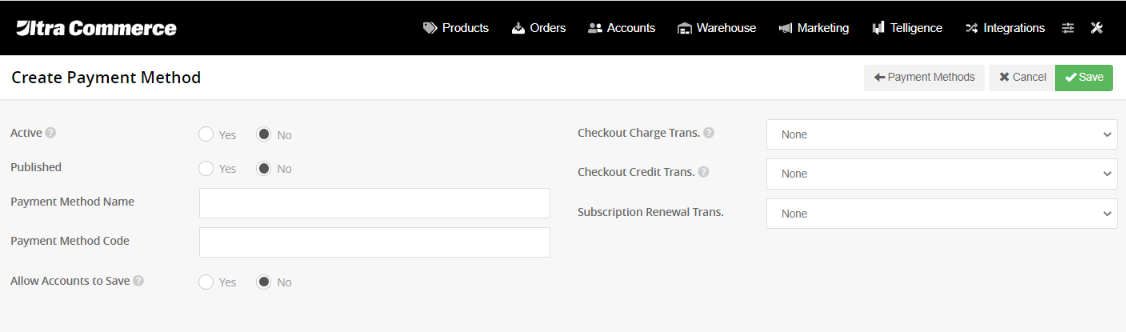
- Active - Yes or No. Set this to Yes when you are ready to activate the payment method for use.
- Published - Yes or No. Set this to Yes so that the payment method displays for use.
- Payment Method Name - Select a name for your payment method.
- Payment Method Code - Select a unique payment method code.
- Allow Accounts to Save - keep this set to No to for term payment methods.
- Checkout Charge Trans. - Yes or No. Can be kept set to No for Term Payment. This type of transaction will be run for all charge order payments when the order is placed.
- Checkout Credit Trans - Yes or No - Can be kept set to No for Term Payment. This type of transaction will be run for credit order payments when the order is placed.
- Subscription Renewal Trans. - None is the only option here.
- Click Save.
Once you have created the Term Payment Payment Method there are some important settings related to Term Payment payment methods.
Settings for Term Payments at the Settings > Account Settings level:
Anything set at this level will apply to all Accounts and all Sites. Here are the settings for Term Payments.
- Eligible Payment Terms
- Default Account Payment Term
- Term Account Credit Limit
To set these to apply for all Accounts:
- Click the Config menu from the Ultra Commerce Nav bar
- Select Settings from the dropdown.

The Settings listing page will appear.
- Expand the Account Setting tab
- Scroll down and you will see the settings for Eligible Payment Terms, Default Account Payment Term, Term Account Credit Limit
.png)
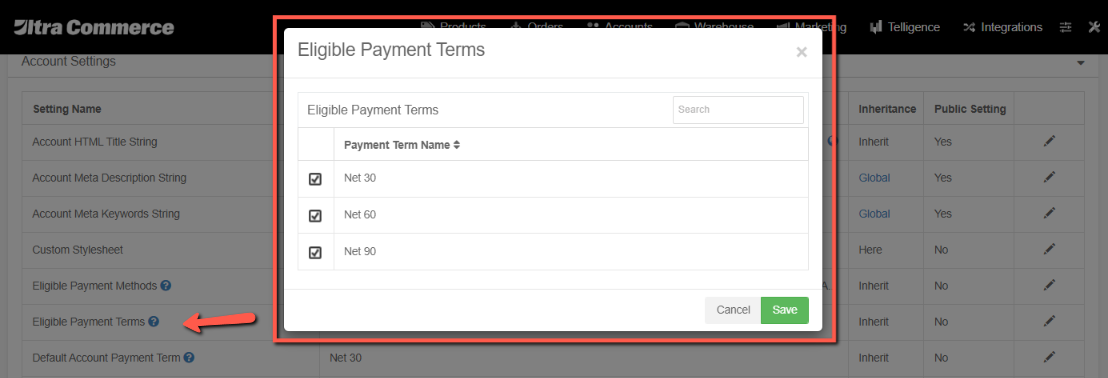
Eligible Payment Terms - You can select with a check mark the payment terms that have been added and set to Active in the admin that you would like to be eligible choices for Accounts.
- Click the pencil icon to the right of this setting and the modal will display.
- Select the Payment Terms by checking them off.
- Click Save
Default Account Payment Term - whatever is selected here will be the default term.
- Click the pencil icon to the right of this setting and the modal will display.
- Select the default Account Payment Term
- Click Save
.png)
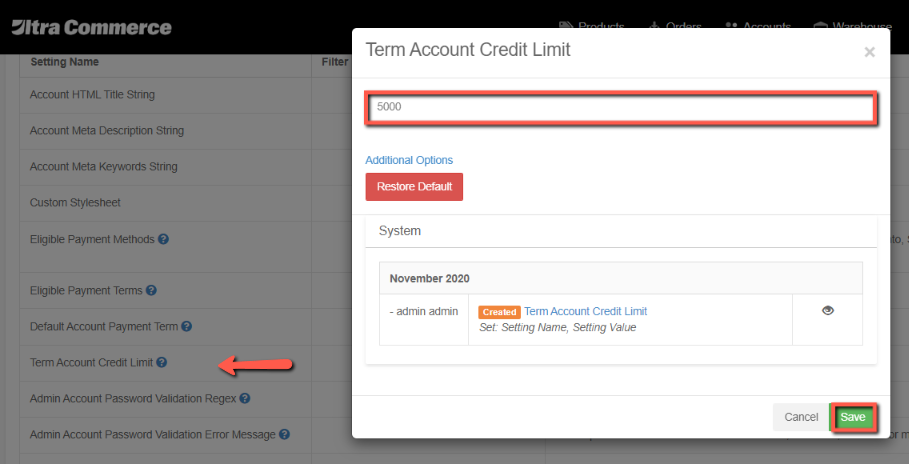
Term Account Credit Limit - the amount here will be what is available to all accounts. This can be changed at the individual account level.
- Click the pencil icon to the right of this setting and the modal will display.
- Fill in the amount for the credit limit
- Save.
If you would like to override and restrict these settings for specific individual or organizational Accounts then you need to navigate to the desired accounts detail page and then change the settings on the Account Settings tab.
Change Settings for Payment Terms at Site level
- Eligible Payment Terms
- Default Account Payment Term
- Term Account Credit Limit
The Term Payment Account Settings can be fine tuned at the Site level as well.
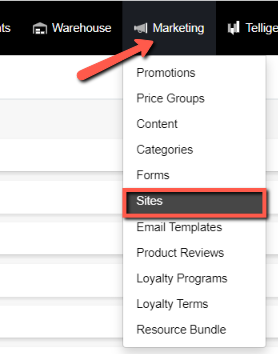
Navigate to the Sites area of the admin by:
- Clicking the Marketing menu on the Ultra Commerce nav bar
- Selecting Sites from the drop down.
On the Sites listing page:
- Click the pencil icon to the right of the desired site.
.png)
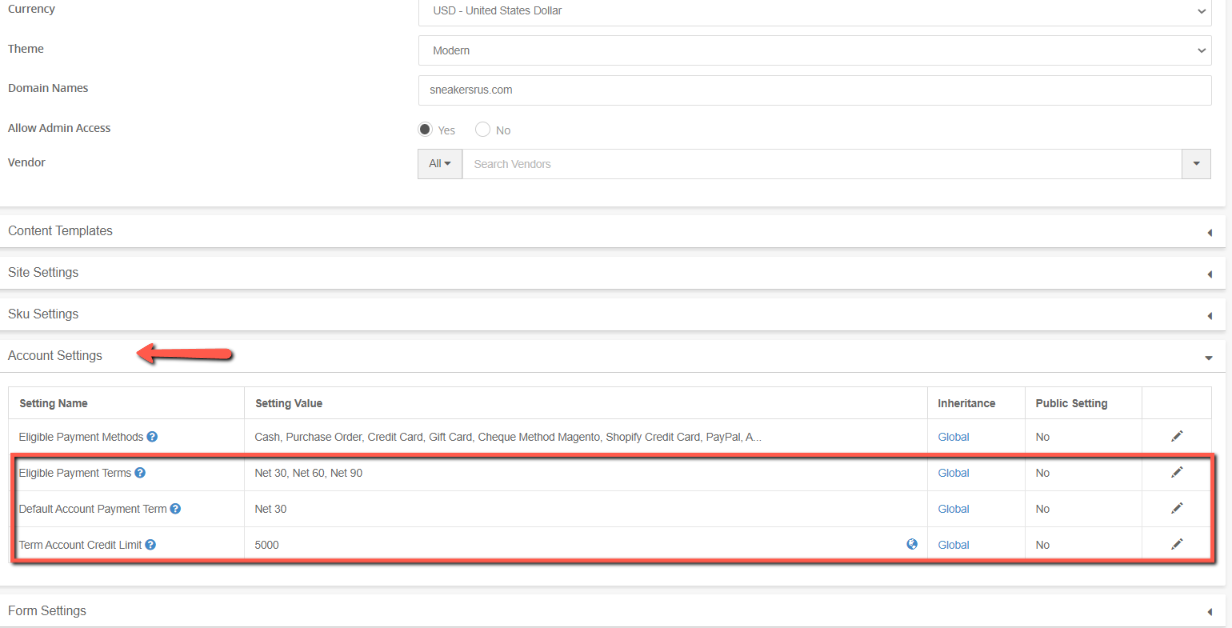
The Site detail page will open.
- Click the Account Settings tab and you will see the settings that relate to Term Payment method.
- Make any changes desired at the Site level for Eligible Payment Terms, Default Account Payment Term, Term Account Credit Limit
- Click Save.
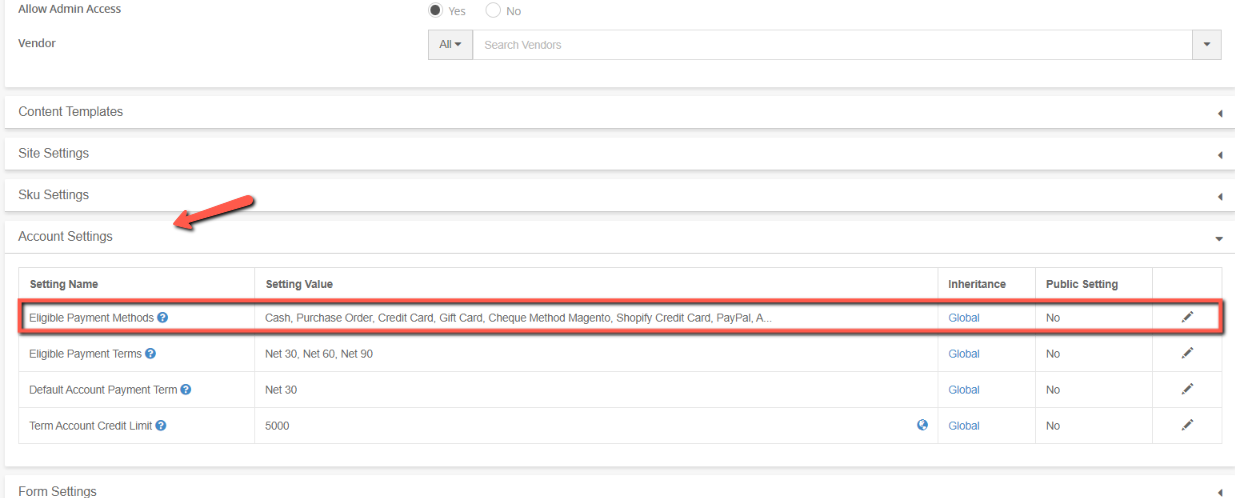
Enable/Restrict Payment methods at the Settings > Account Settings level
To make sure a payment method is available for use:
- Select Config from the Ultra Commerce navbar and
- Choose Settings from the drop-down.
- Expand the Account Settings tab.
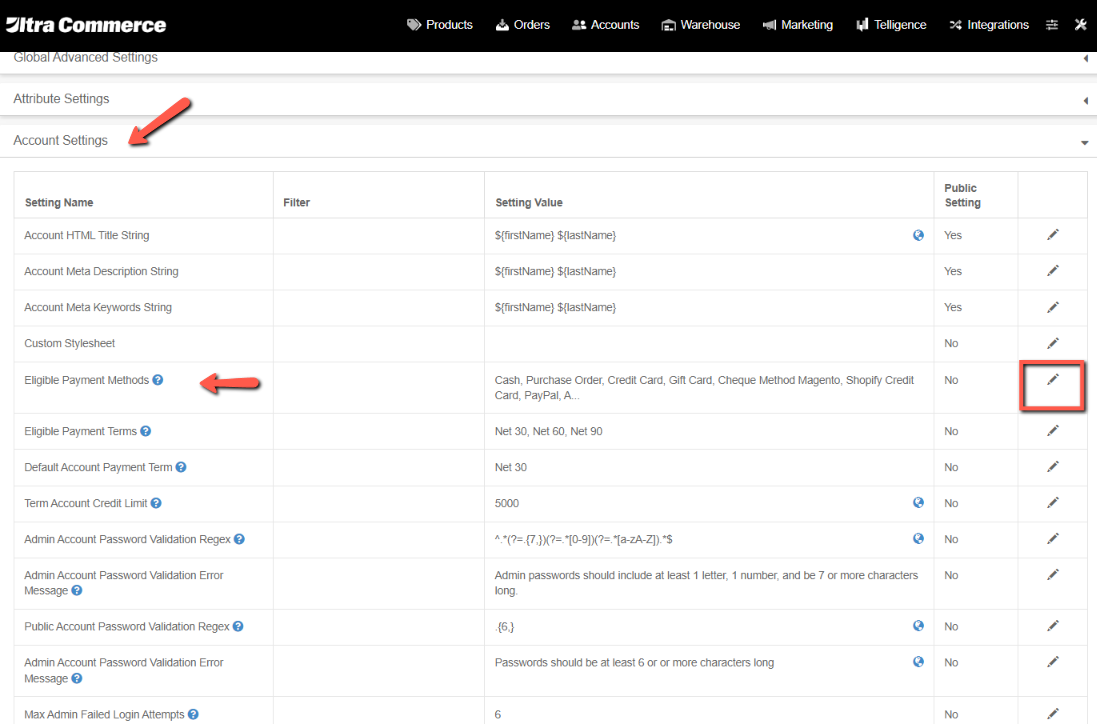
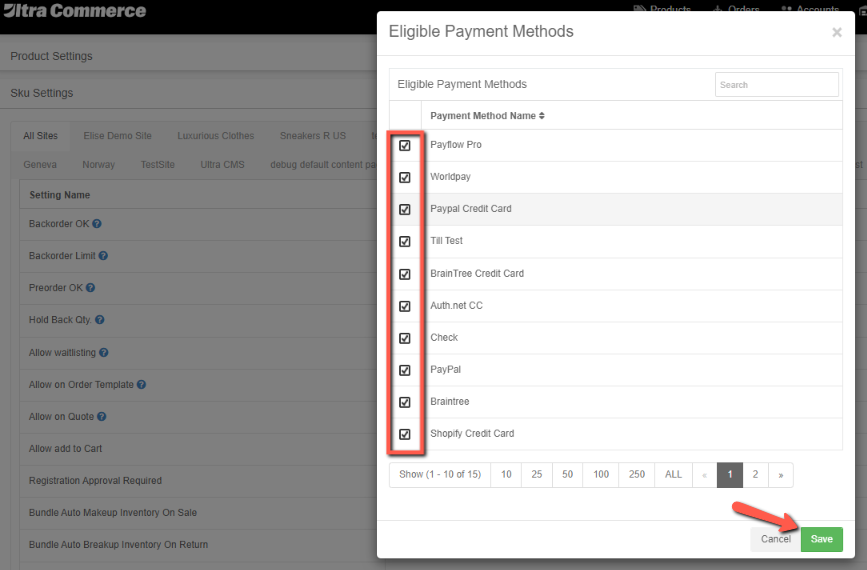
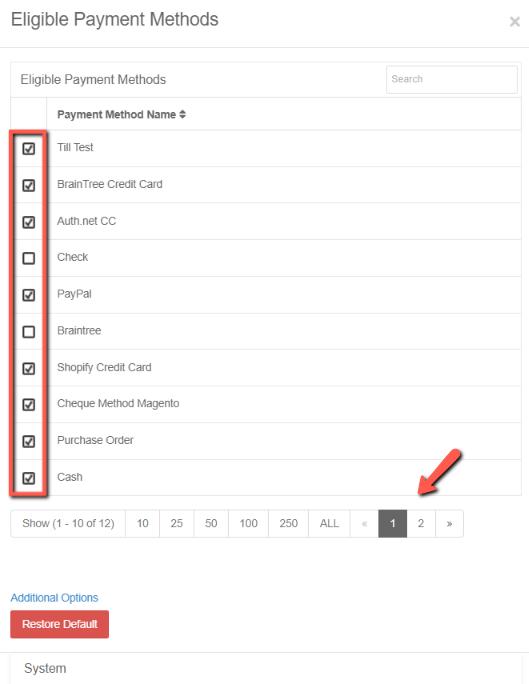
Notice the setting for Eligible Payment Methods.
- Click the pencil icon to the right of this setting.
You will see the Eligible Payment Methods modal and all the choices that are active.
- Put a check mark next to the desired payment methods.
- Click Save at the very bottom of the modal.
Note, these are global settings. They can be overridden at the Site and individual or organizational Account level.
Enable/Restrict Payment Methods at the Site level
Once you have set up your payment methods there is an account setting at the Site level so you to fine tune the global account settings if you have multiple sites.
To enable/restrict Payment Methods by Site navigate to Sites area by:
- Clicking the Marketing menu on the Ultra Commerce nav bar
- Selecting Sites from the drop down.
On the Sites listing page:
- Click the pencil icon to the right of the desired site.
The Sites detail page will open.
- Click the Account Settings tab and you will see the settings including Eligible Payment Terms.
- Click the pencil icon to the right of the Eligible Payment Terms setting.
- Select the terms desired
- Save.
Enable/Restrict Payment Methods at Product Type level
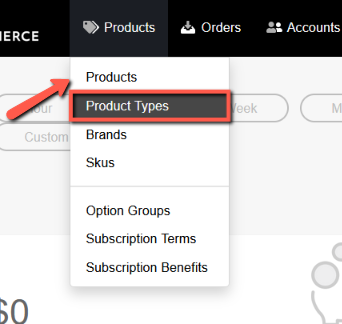
You also have the ability to restrict Payment Methods available for product type by:
- Click Products menu on the nav bar.
- Select Product Types from the drop down.
The Product Type listing will display.
On the Product Type listing page find the product type that you would like to edit by:
- Clicking the black triangle next to the parent product type to expand and display the subtypes.
- Clicking the pencil icon to the right of the desired Product Type.
.png)
The Product Type detail screen will appear. To enable or restrict payment methods for this Product Type:
- Expand the Sku Settings tab.
At the top of the Sku Settings tab you will see tabs for Sites if you have multiple Sites.
- Keep All Sites selected if you want the payment methods setting to apply to all sites, if not, click the desired Site tab.
- Scroll the the Enable Payment Methods setting and click the pencil icon to the right.
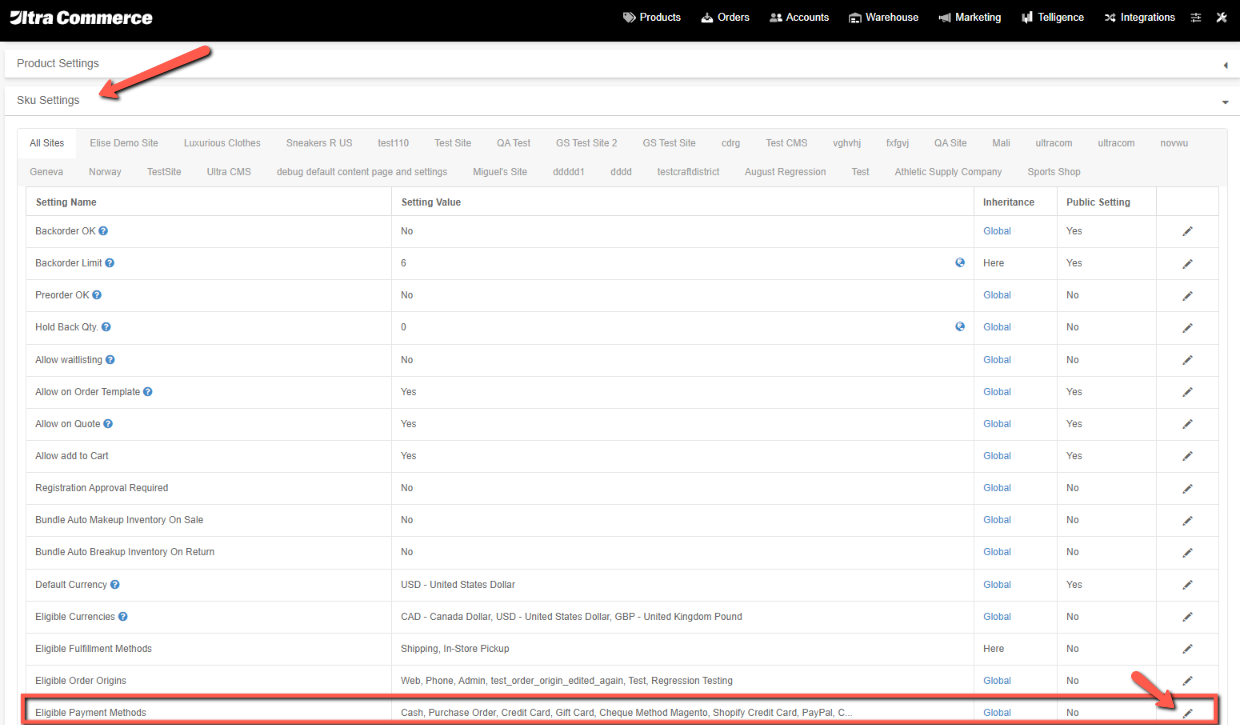
On the Eligible Payment Methods modal:
- Check / un-check the desired payment methods.
- Click Save.
- Repeat this process for any other Site you may have.