Merchandise Product
Merchandise Products can easily be created through the Ultra Commerce admin.
- Create a Merchandise Product
- Edit the Basic Fields
- Product Tabs on the Product detail
- Actions Menu
Create a Merchandise Product
From the Product listing page you can create any product type.

In order to create a Merchandise Product:
- Click on the blue +Create button at the top right corner of the screen.
- Select Merchandise Product from the drop-down.
The Create Product screen will appear.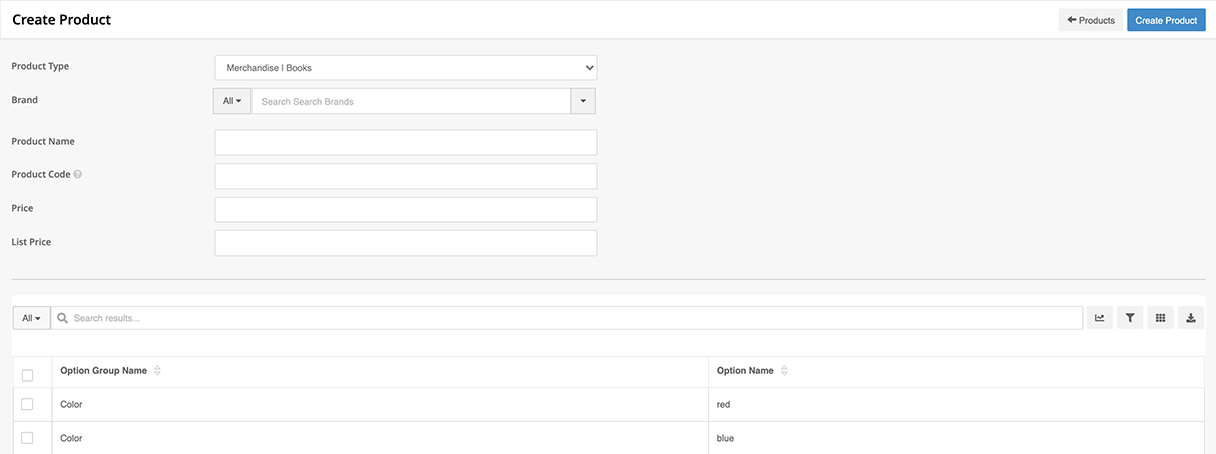
Fill out the fields:
- Product Type - Select the appropriate product type from the drop-down. There will be Product Types in the drop-down if you have created specific merchandise product types. These are created in the Product Types section of the site. There will one default choice if you have not created merchandise sub-types.
- Brand - Select a Brand for the product if there is one associated with this product, if there is none, keep it set to None. Brands are created in the Brands section of the site.
- Product Name - Add in a product name, this field is required.
- Product Code - Add in a product code that is a unique string (alphanumeric, no spaces, no special characters). This field is required.
- Price - Add in a price for the product. After the product has been saved, price can be fine-tuned at the sku level. This field is required.
- Options - Select the options for the product by placing a check mark in the box to the left of the option. After the basic fields have been filled in, Options that are available for choice will display. Options are the the potential characteristics of each product, such as size, color, etc. Options need to be added to Ultra Commerce in the Option Groups section of Ultra Commerce before they can be assigned to a product, so it is helpful to have them added to Ultra Commerce first.
Once all options have been selected and the basic fields are complete:
- Click the blue Create Product button in the upper right-hand corner.
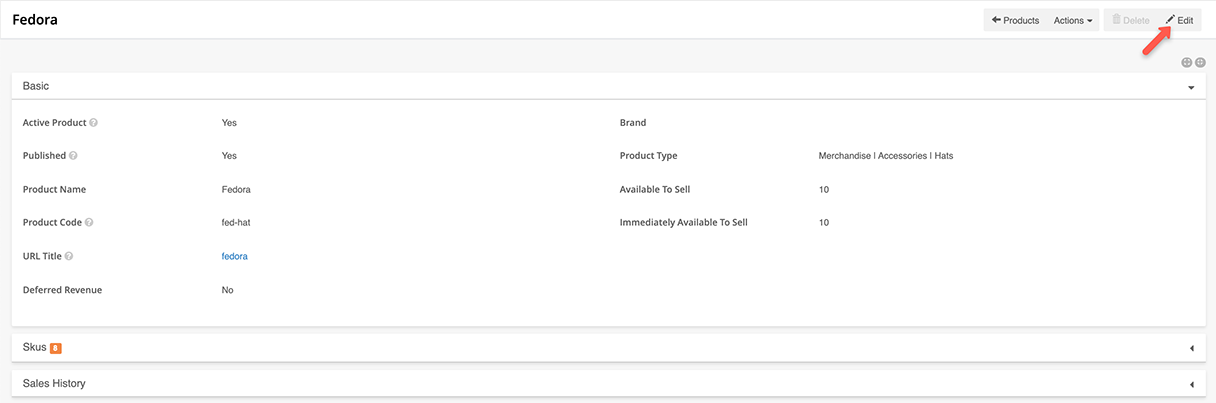
The product detail screen will display in view mode - indicated by the pencil Edit icon in the upper right hand corner of the screen.
Editing the Basic Fields
On the Basic tab are the fields that were selected during product creation, plus some new fields that can be edited.
- Click the pencil edit icon in the upper right hand corner.
The product detail screen will be in edit mode.
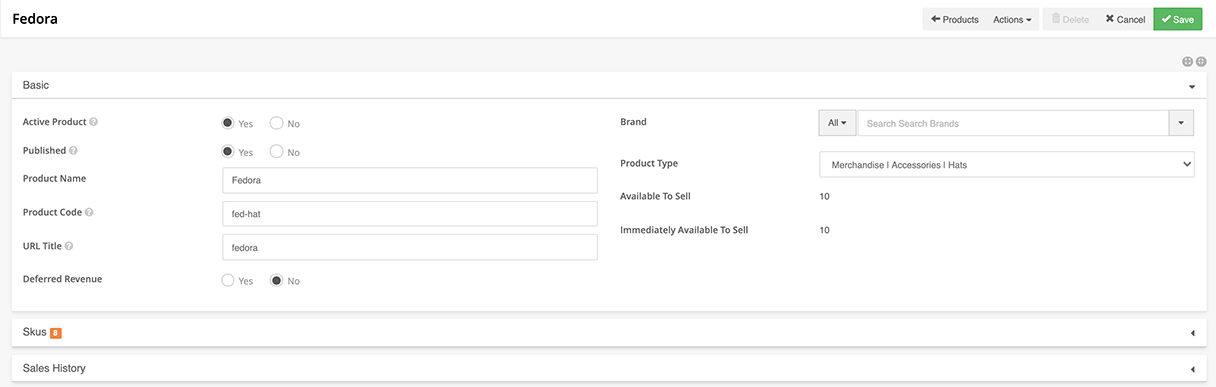
- Active Product - Yes or No. By default this is set to Yes when the product is created and allows it to be utilized on the back-end. This must be set to Yes to display on the front-end as well.
- Published - Yes or No. By default this is set to No when the product is created and must be manually set to Yes for the product to be published and to display on the front-end.
- Product Name - Added during product creation,.
- Product Code- Added during product creation, this field must be a unique string (alphanumeric, no spaces).
- URL Title- This field by default is the product name in lower case. It is used to create the front-end URL for SEO purposes. The value must contain only alphanumeric characters as well as - or _. Best practice is to leave this value all lower case.
- Deferred Revenue - By default this is set to No. If set to Yes, this represents a prepayment by customers for goods or services that have yet to be delivered. This is a flag that can be set to be used with an accounting integration.
- Brand - Added during product creation.
- Product Type - Added during product creation.
- Available to Sell - The amount of product available to sell including stock not physically in possession.
- Immediately Available to Sell - The amount of stock available to sell that is physically in possession.
Depending on your Ultra Commerce setup, additional steps may be required to display your Ultra Commerce products. In many instances, the product must be tied to a specific listing page.
Product Tabs on Product detail
There are many additional tabs that are also created to aid in content population and categorization, which are the product's attributes. These will appear below the Basic section. Below is an explanation of the common tabs found on merchandise product detail. Other tabs unique to other product types will be described in the corresponding section of the user guide.
.png)
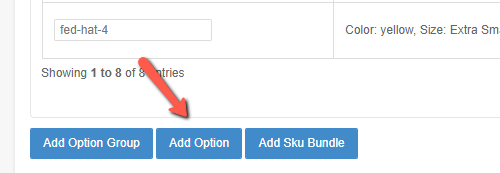
Skus tab
It is important to review the skus created. Below is a screen-shot of the Skus tab expanded. This is where the skus that were generated can be edited and by navigating to the individual skus more details for each sku can be edited and any unwanted skus can be deleted.
Skus have been automatically generated based on the options chosen during product creation. One sku will be created by default if no options are selected at creation.
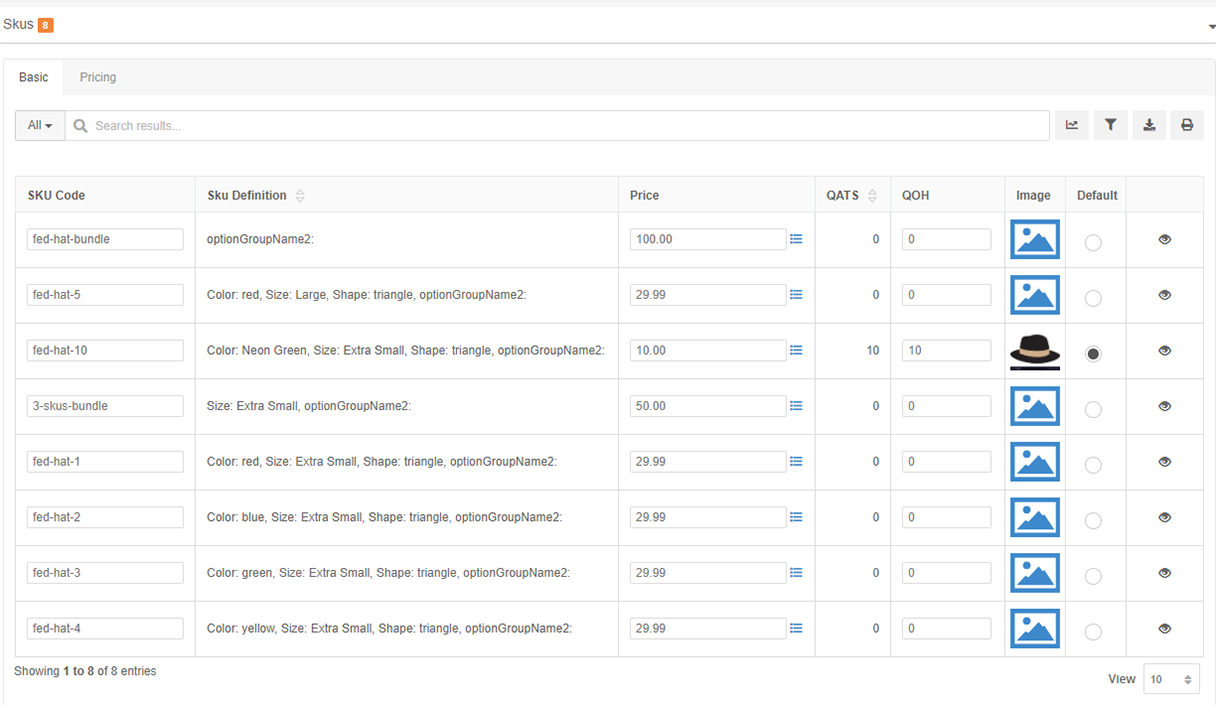
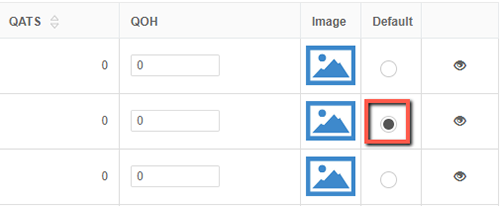
Set the Default Sku
When skus are created one of them will be set as the default sku. To change the sku that is the default, select it by clicking the radio button to the right of the image field.
Edit Skus - Sku Code, Price, QOH
From the Skus tab of the product page, users have the ability edit the Sku Code, Price or QOH by clicking directly into those fields.

- Click into the Sku Code field, change it and then click Save.

- Click into the Price field, change the price, and then click Save.

- Click into the QOH field, add a quantity and then click Save.

The Stock Adjustment modal will appear.

- Add how much the New Quantity will be which is the amount entered in the QOH field on the previous screen. This will create a stock adjustment in the Warehouse section of Ultra Commerce. Find out more about Stock Adjustments in the stock adjustment section of the user guide.
- Pick a stock Location using the typeahead field. Find out about adding Locations in the Locations section of the user guide as they must be defined in order to add
Add an Image to a Sku from the Skus tab

Images can be edited right on the Skus tab.
- Click the Image icon to the right for the desired sku.

- Click the Choose File button to launch your computer's file search dialog to find and select an image to upload.
- If you want to overwrite the image name (the one that was automatically generated), put a check in the checkbox to the left of Overwrite default image name. Then fill in the Image Name field with the desired name. If not, ignore this step.
- Click the green Save button on the bottom right of the modal.
The image will now appear in the Image column of the Skus tab. You can also manage images on the Images tab. This is described in the Images tab section below.
View and edit from the Sku Detail page
If you would like to view a specific sku's detail page, or you would like to edit a specific sku from the sku detail screen:
- click the view eye icon to the right of the desired sku.

The sku detail screen will display in View mode. Fields on the Basic section can be edited by
- clicking the Edit pencil button in the upper right-hand corner of the Sku detail screen.
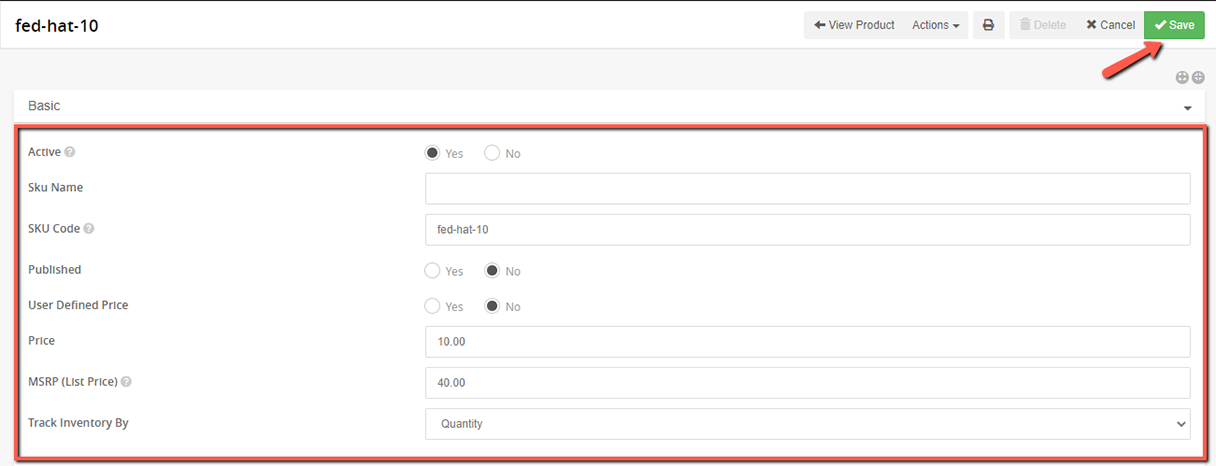
Active - Check off whether the sku is active or not. By default this is set to Yes when the product is created and allows the sku to be utilized on the back-end. This must be set to Yes to display on the front-end as well.
Sku Name - Add a sku name if desired.
Sku Code - Automatically generated based on the product code, this may be edited as long as it is unique, and contains no spaces or special characters.
Published - Choose Yes or No. By default the skus are set to No when the product is first created and must be manually set to Yes for the skus to be published and to display on the front-end.
User Defined Price - Choose Yes or No, by default this is set to no so that the user does not define the price.
Price - The price is automatically filled based on the price entered at product creation, however, it can be changed here at the sku level.
(MSRP) List Price - Add a price here if there is a list price.
Track Inventory By - Quantity or Measurement drop-down - select quantity if you want to track inventory by the number of items or measurement if you want to track inventory by size or weight or some other unit of measurement.
When you are finished editing the sku, click Save at the top right of the screen.
There are also additional tabs with information for this sku below the basic information as shown in the screenshot below. More about these tabs can be found in the Sku section of this user guide.

Delete a Sku from the Sku detail screen
From the sku detail screen if a sku has no inventory and it is not the default sku for the product, the sku can be deleted. This is something that might make sense early on when setting up products, but once it has inventory and orders, delete will be disabled.

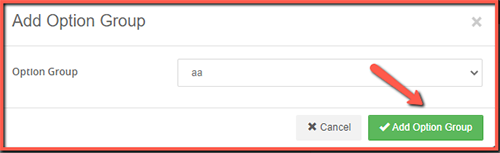
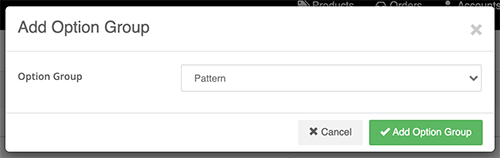
Add an Option Group
If you discover that you forgot to add an Option Group to a product, this can be done at the product level later. For example, in the merchandise example of the Fedora Hat, color and shape option groups were added during product creation, but maybe Size needs to be added.
To do this, you must first add the option group Size to associate it with the product. The Option Groups available for selection will be ones that have already been created in the Option Groups section of the site. If you already have the size option group added to the site:
- Click Add Option Group blue button.
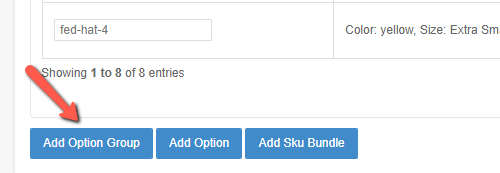
- Select Size from the Add Option Group modal drop-down.
- Click the Add Option Group green save button.
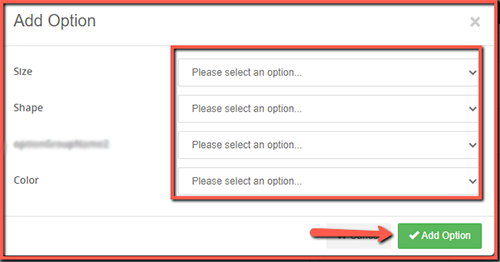
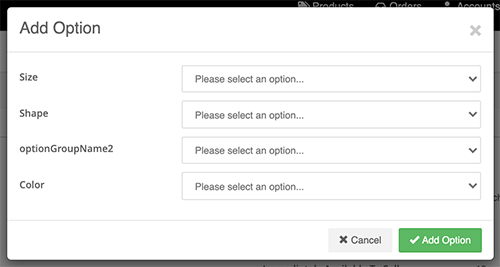
Add an Option
To add an option that was not previously added to the product:
- Click the Add Option blue button.
- Select the Options that you would like from the Add Option modal drop-down.
- Select a unique combination of options to create a sku.
- Click the Add Option to save the sku with the options selected.
Add a Sku Bundle
A product can also have a sku that is a combination of a 2 or more skus bundled together.
To create a Sku Bundle:
- Click the Add Sku Bundle blue button.
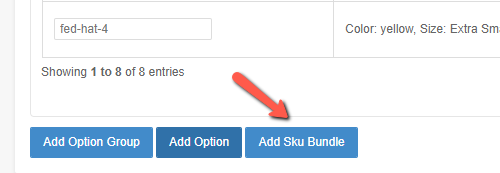
On the Add Sku Bundle screen there will be a Sku code and price field as well as many skus available for selection.
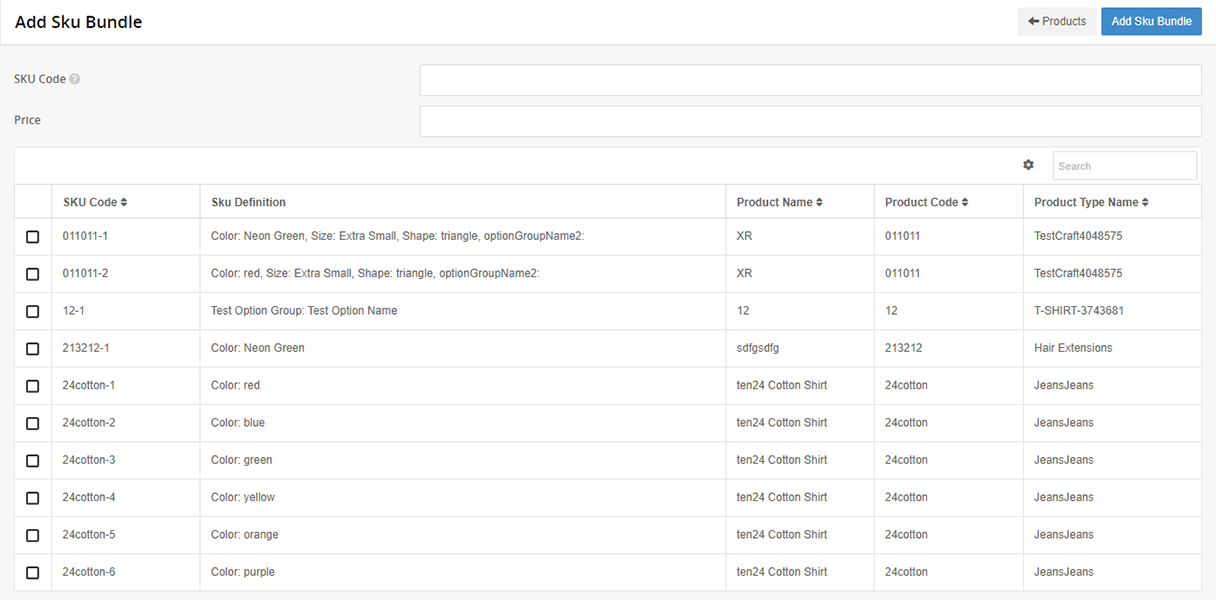
- Fill in the Sku Code field.
- Fill in the Price field.
- Select the desired skus.
- Click the Add Sku Bundle blue button at the top of the screen.
The newly added bundle will display on the Skus tab for the product. You will now need to Makeup the sku bundle by pulling together the individual skus from a location so that the sku can be sold.

Add Stock to a Sku Bundle aka Makeup Sku Bundle
- Click on the eye icon to view the Sku Bundle detail screen.
The Sku Bundle detail screen will display. When the Sku Bundle is initially created, there is no stock until you "makeup"the sku bundle by pulling together the skus that make up the bundle from the location that has the skus in stock.
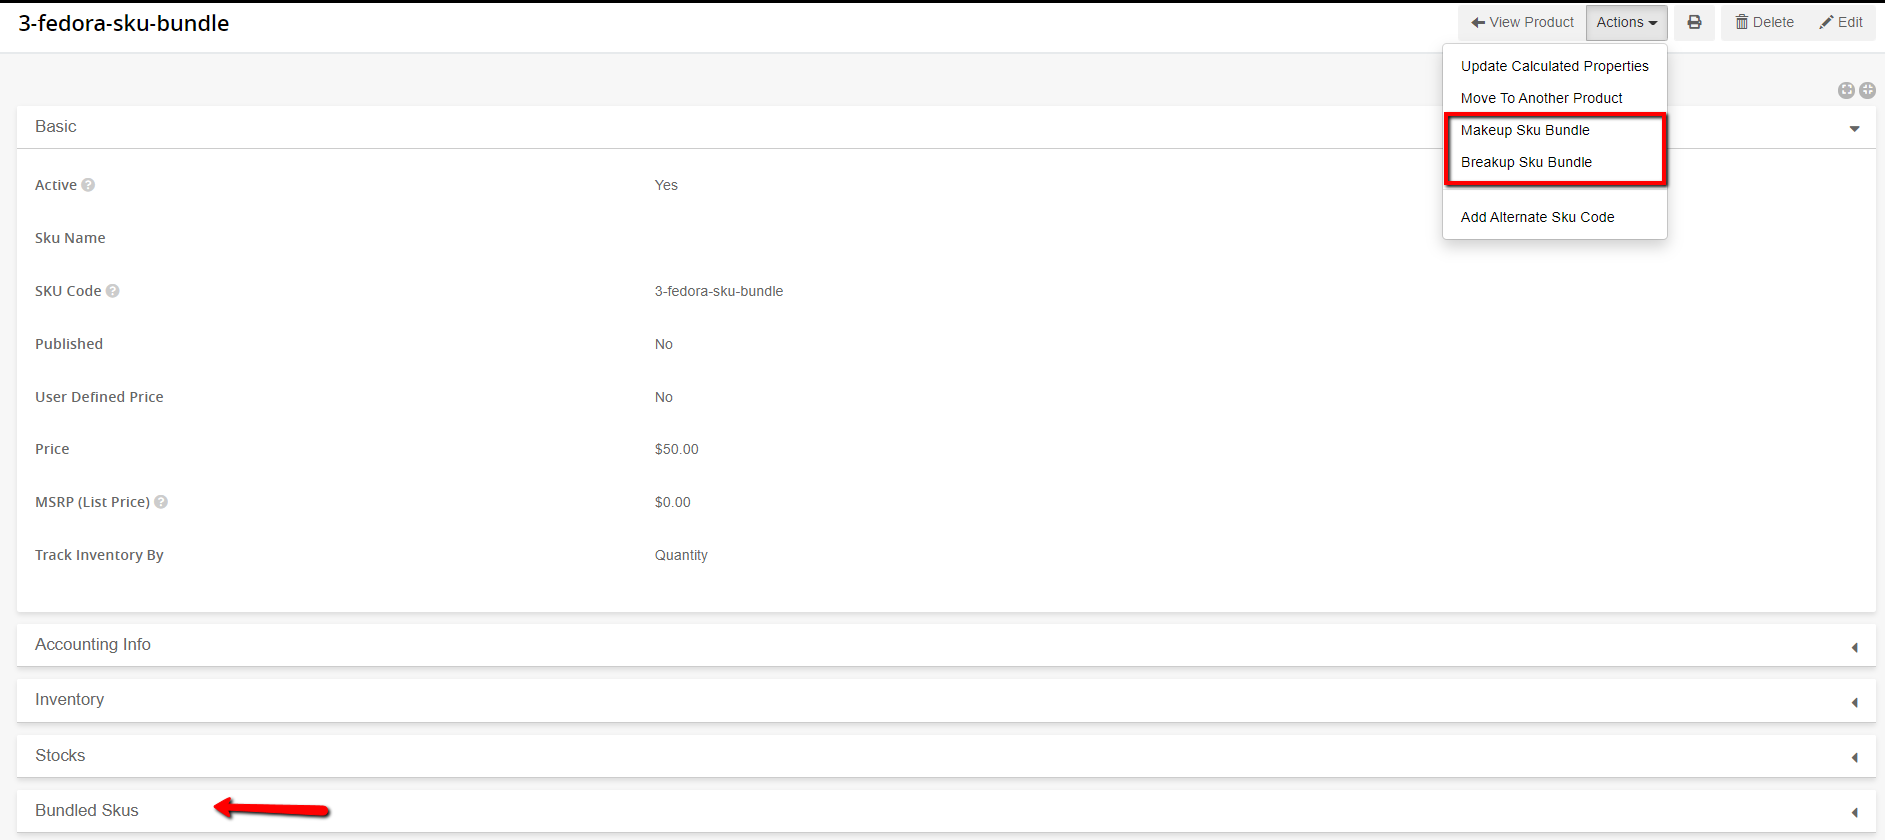
To create stock for Sku Bundles:
- Click the Actions Menu
- Select MakeUp Sku Bundle from the dropdown.
The Makeup Sku Bundle modal will appear.
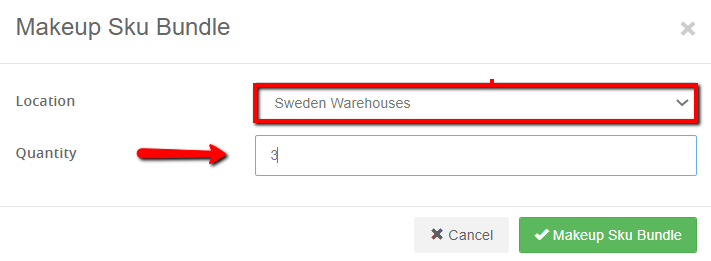
From the Makeup Sku Bundle modal:
- Select the Location where the skus are in stock.
- Select the Quantity for the sku bundle. Make sure that there is enough stock of the individual skus that comprise the stock.
- Click the Makeup Sku Bundle button to create the stock
The product will now display the sku bundle with a QOH so that it can be sold. You can also see the Stock Adjustment that is created in the Stock Adjustments listing area of the admin.

Sales History tab
The orders for the product will appear on this tab.

Breakup a Sku Bundle
You might need to break up a sku bundle to make individual skus available for sale.
From the Sku Bundle sku detail Screen
- Click the Actions Menu
- Select Breakup Sku Bundle from the dropdown
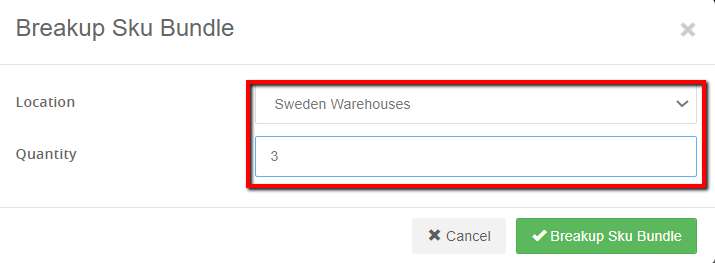
- Select the Location where the sku bundle has stock.
- Fill in the Quantity to break up.
- Click the Breakup Sku Bundle button.
The Sku Bundle will now have an updated QOH. You can also see the stock adjustment that is created in the stock adjustments listing of the admin.
Images tab
All default and alternate images for the product are displayed within this tab. When a product is created, all skus for the product are given a blank default image. In this tab, an administrator can replace these placeholders with actual photography. The requirements for the image size are Max Image Size: 10MB
- Click on the Default Images or Alternate Images tab. Clicking on Default will display a placeholder for each sku to upload an image. Alternate images allows for adding additional images for a sku for example if the product was a dress then additional images of the front, back, side and an image of a person wearing the dress could be uploaded.

Add a Default or Alternate Image to Images tab
The image has a Max Image Size:10MB
To upload an image for one of the placeholders
- Click on the + sign to launch to launch the Upload Image modal.

The Upload Image modal will appear.
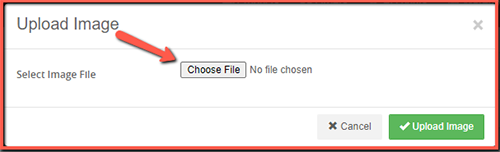
From the Upload Image modal:
- Click on the Choose File button to search for an image on your computer.
Your computer's dialog box for uploading images will appear. It will resemble something like this depending on your computer. Follow the normal procedure on your computer for selecting an image.
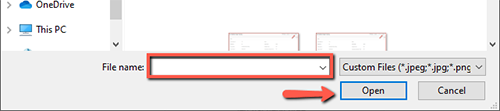
- From your computer select a file from the desired folder.
- Click Open
Now from the Upload Image modal:
- Click the Upload Image green button.
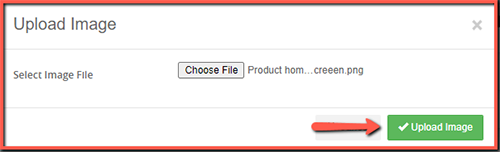
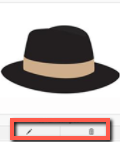
Your image will now be uploaded with the ability to edit it by clicking the pencil icon or delete it by clicking the trash icon.
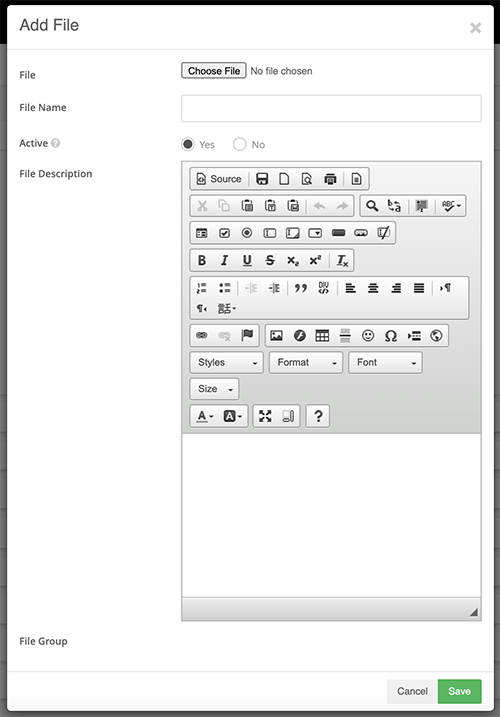
Files tab
Any files such as spreadsheets, word docs, text docs, pdf's with product specs or instruction manuals, etc. may be added here.

Add Files to the File tab
To add a file:
- Click the + Add File button.
The Add File modal will appear.
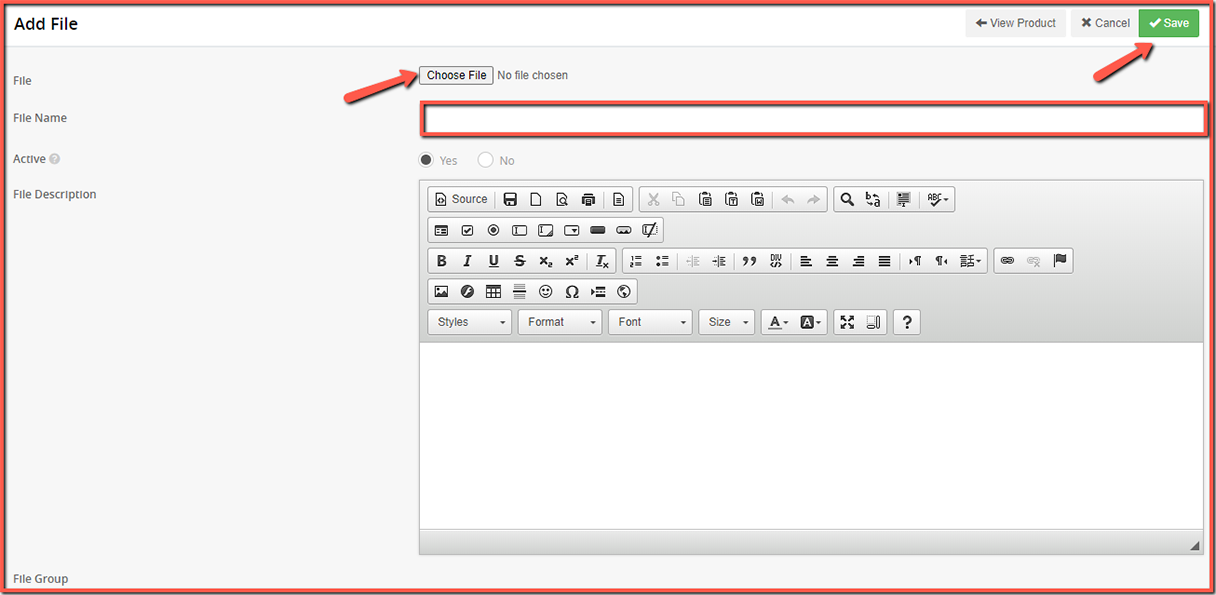
- Click Choose File to select a file from your computer.
- Fill in the File Name field.
- Set the Active field to Yes or No. By default it is set to Yes.
- Enter text in the File Description field.
- Click the Save button.
The file will be listed on the File tab with the ability to Download, Edit, or Delete the file.


Product Description tab - Add or edit description
The description of products may be added WYSIWYG here. The product must be in edit mode to view this text editor. If it is not:
- Click the pencil icon at the top right corner of the product detail screen. Then the editor will display on the product description tab.
- Type the product description into the text editor.
- Click Save at the top right corner of the product detail screen.
.png)
The product description will Save and be viewable.

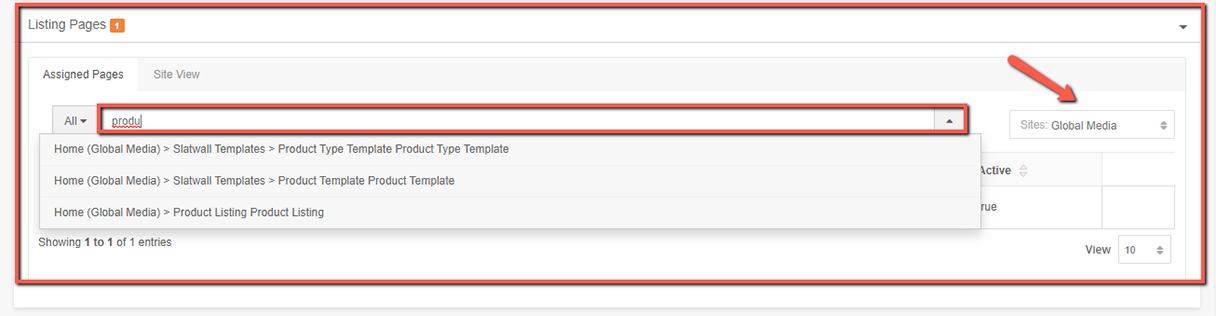
Listing Pages tab
All page hierarchies for Ultra Commerce CMS and any integrated third party CMS software will appear here. There may be additional steps required to view the pages on the front end.
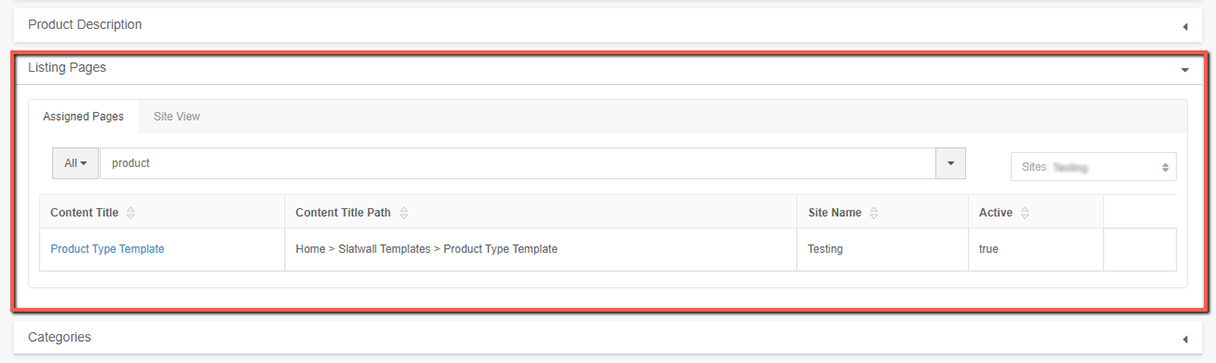
The Assigned Pages tab shows to which pages the product has been assigned.
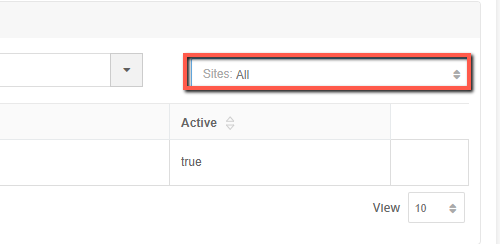
The Site tab shows the page hierarchy for all or the selected site in Ultra Commerce, depending on the selection of the Sites drop-down on the right-hand side of the tab.
If you would like to assign a product to the a Listing Page:
- Make sure that the product detail page is in edit mode. It it isn't, click the pencil icon at the top right of the product detail screen. If there is a green Save button at the top right of the screen then it is in edit mode.
- Use the typeahead on the Assigned Pages tab to search for a listing page if you know what you are looking for and then click Save to save it. If you don't save the selection and then click on Site view, the selection will not be saved.
- Alternatively, from the Site View tab you can click to view the page hierarchy and then place a check in the checkbox of the desired pages.
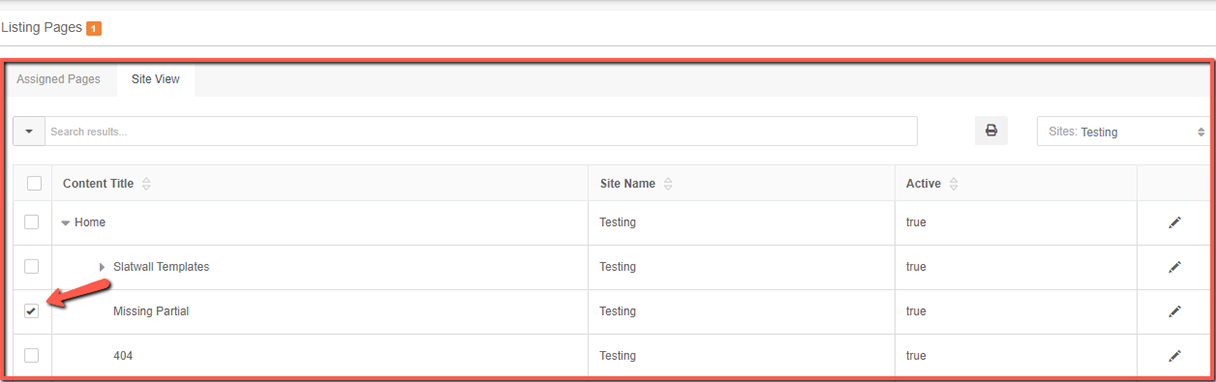
- Click Save at the top right of the product listing to save the listing pages.
Categories tab
Product Categories must first be set up in the Category section of Ultra Commerce. before they can be assigned to products. Visit the Categories section of the user guide for instructions on how to create them. Product Categories are not assigned or set to display by default.
If you would like to assign a product to a particular category:
- Check the corresponding box on the left of the category and save.
.png)
Related Products tab
This is where you will find any related products that have been selected for the product.
In order for Related Products to be added, the product detail screen must be in edit mode, as indicated by the Save button at the top right of the product detail screen. If there is pencil icon, click it.
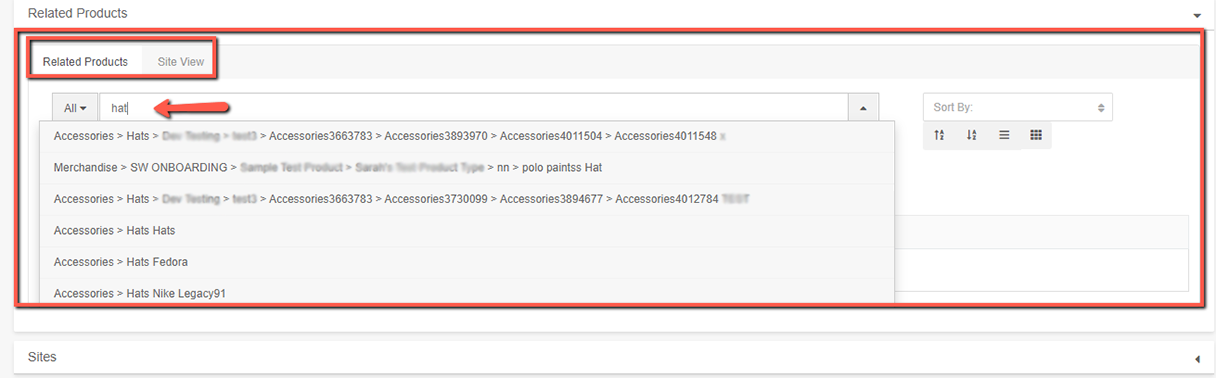
- In the type-ahead start to type the related product
- Select the product from the drop-down
- Each time a product is selected it will get listed.
- Once all related products have been selected, click Save at the top right hand corner of the product listing page.

Sites tab
Sites allows the sale and display of an individual product to be limited to specific sites or sales channels as are set up. For example, a Ultra Commerce client may have a microsite where they only want to sell a limited selection of products. The sites option allows for the merchandising and product team to mark a product as only available on any selected site.
If a product is limited by the site selection, then they can use that to only display the applicable products on the front end.
Sites may be actual websites. www.store.com,www.myotherstore.com or limited to a sales channel like "www.store.com" and b2b portal.
If there are no selections made, then the product is available on all sites (which is the default option).
If you would like to assign a product to a specific site:
- Make sure the product detail screen is in edit mode.
- Put a check mark in the box to the left of the Site(s)
- Click Save at the top right corner of the product detail screen.

The sites selected will now display here and the product will only display on those sites.

Product Reviews tab
This is where Product Reviews can be managed. Product reviews are what customers leave after purchasing products or services.

Vendors Tab
Used for inventory management, selections on this tab will allow admins to place and track vendor orders with this product. When selected, this product will be available in the inventory management options for the selected vendor.
- Make sure the product detail is in edit mode
- Put a check in the box to the left of the vendor
- Click Save at the top right corner of the product detail screen.

Product Settings tab
This is where global product settings may be viewed and if desired set at the product level. Information can be found about the global Product Settings in the Settings section of the user guide.
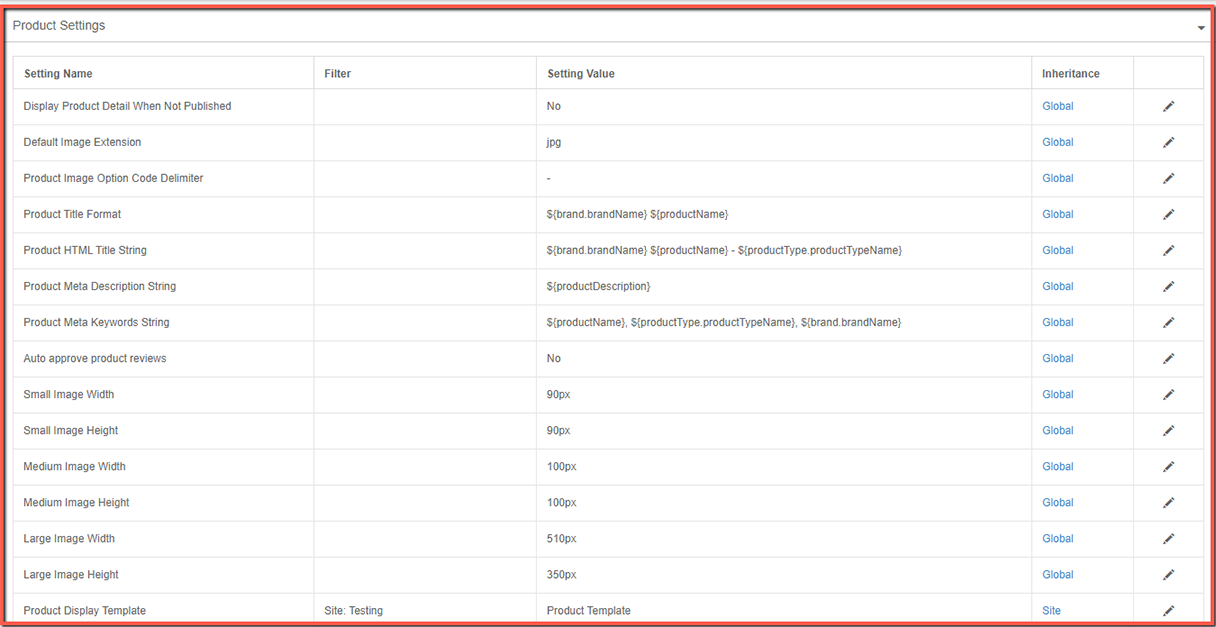
Display Product Detail When Not Published - Yes or No
Default Image Extension - jpg, png etc.
Product Image Option Code Delimiter - If an Product Image Group for an Option Group is set to Yes, this will be Product code + Option.
Product Title Format - ${brand.brandName} ${productName}
Product HTML Title String, Meta Description String, and Meta Keywords String - ${brand.brandName} ${productName} - ${productType.productTypeName}
Auto approve product reviews - By default No, Yes or No.
Small Image Width. Default pixel width for small images (pulled in code to automatically resize images to small).
Small Image Height. Default pixel height for small images (pulled in code to automatically resize images to small).
Medium Image Width. Default pixel width for medium images (pulled in code to automatically resize images to medium).
Medium Image Height. Default pixel height for medium images (pulled in code to automatically resize images to medium).
Large Image Width. Default pixel width for large images (pulled in code to automatically resize images to large).
Large Image Height. Default pixel height for large images (pulled in code to automatically resize images to large).
Product Display Template - This will be broken down by Site in Ultra Commerce.
SKU Settings tab
This is where SKU settings used for inventory management at the product level can be viewed and if desired, set to override global settings. Settings are made at the global level in Config>Settings>Sku Settings of Ultra Commerce. Information can be found about the global Sku settings in the Product Inventory Overview section of the user guide.
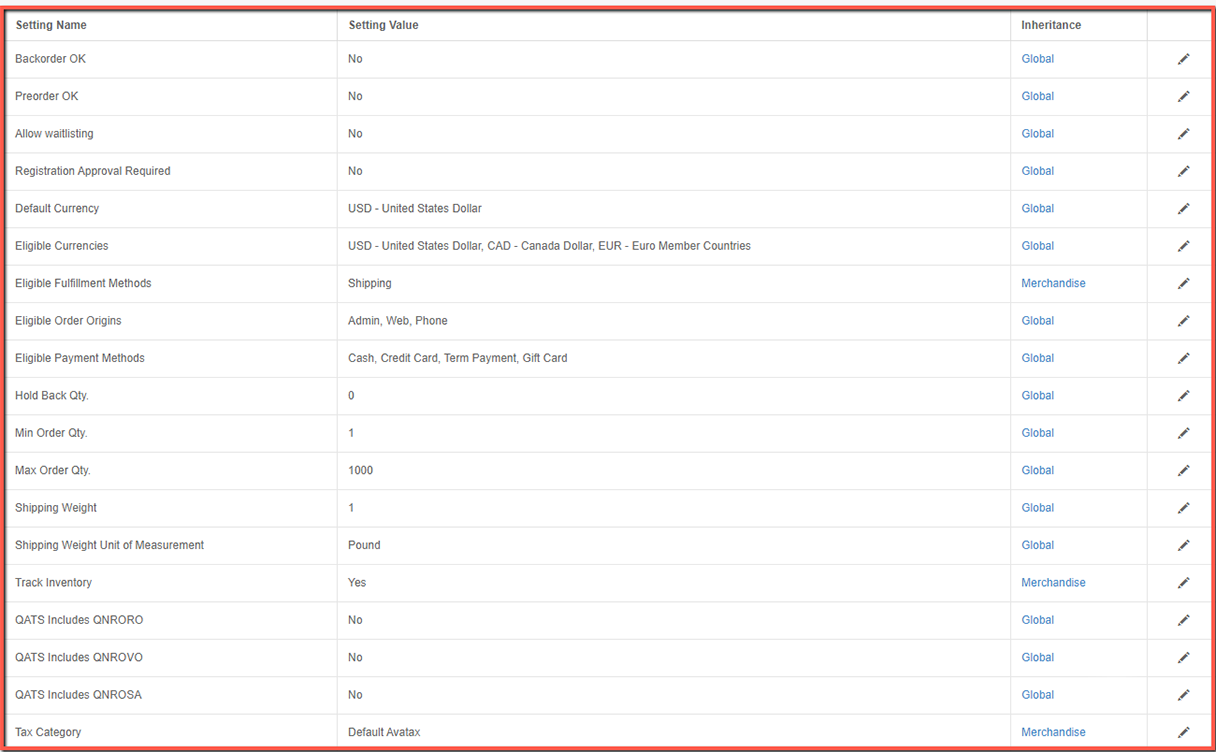
Backorder OK - Toggle whether or not it is possible to permit orders for out-of-stock SKUs at product level.
Preorder OK - Toggle whether or not it is possible to permit orders for not-yet-released SKUs at product level.
Allow Waitlisting - Allows for waitlisting of full events.
Default Currency - This is the currency selected from eligible currencis.
Eligible Currencies - These are all eligible currencies for the skus at the product level. To learn more about setting up Currencies for use in Ultra Commerce, visit the Currencies section of the user guide.
Eligible Fulfillment Methods - The eligible fulfillment methods are set here. To learn more about setting up fulfillment methods for use in Ultra Commerce visit the Fulfillment Methods section of the user guide.
Eligible Payment Methods - Choose which methods (cash, credit, debit, PayPal, etc.) are viable means of payment for SKUs inheriting global settings. To learn more about setting up payment methods for use in Ultra Commerce visit the Payment Methods section of the user guide.
Hold Back Quantity - An amount of inventory that that will not be sold. How many of a SKU you wish to have on-hand at all times. This primarily affects Quaqtity Available To Sell (QATS) count. For example, if you want to have one of a SKU at all times, set this to one, and QATS will be calculated as if having an inventory of one were the same as having an inventory of zero.
Min Order Qty - Used for SKUs which are not sold individually; otherwise set to 1.
Max Order Qty - Used for SKUs which are limited in availability (i.e. "no more than 2 per order"); otherwise set high value (i.e. 1000).
Shipping Weight - The shipping weight for a product is set here.
Shipping Weight Unit of Measurement - The shipping weight unit of measure is set here.
Track Inventory - This is an important setting for inventory that allows Ultra Commerce to keep track of inventory on hand. Set to Yes in global Sku Settings of Ultra Commerce so that all skus inventory is tracked.
QATS includes QNRORO - Quantity not received on return order is included in QATS.
QATS includes QNROVO - Quantity not received on vendor order is included in QATS.
QATS includes QNROSA - Quantity not received on stock order is included in QATS.
The QATS settings above determine whether you wish to include SKUs ordered but not received in their expected shipment as if they were in your stock and available to be sold. By default these should be set to No.
Tax Category - Choose the default tax category for SKUs from the dropdown menu. For more information on tax categories, consult Tax Categories of the user guide. Default category should consist of all regions in which you are incorporated.
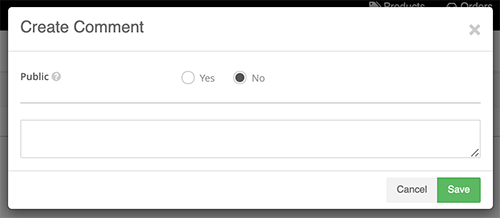
Comments tab
This tab is where comments about the product can be viewed or added by clicking the +Add Comment button.

System
This is a log of changes made to the product.
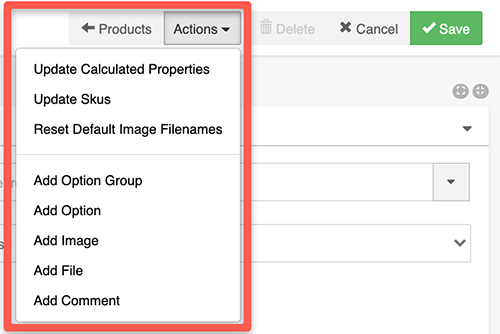
Actions Menu
The actions menu is a shortcut menu for commonly used actions.
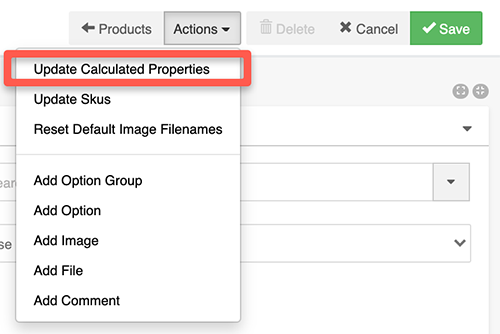
Update Calculated Properties
This allows for the update of properties that are happening in the background, such as inventory transactions from another system, that are updated in Ultra Commerce once a day to be updated sooner. If there are lots of transactions such as orders then using the Update Calculated Properties feature would allow for a more accurate snapshot of inventory at a point in time.
Select this from the Actions drop-down to update Calculated Properties.
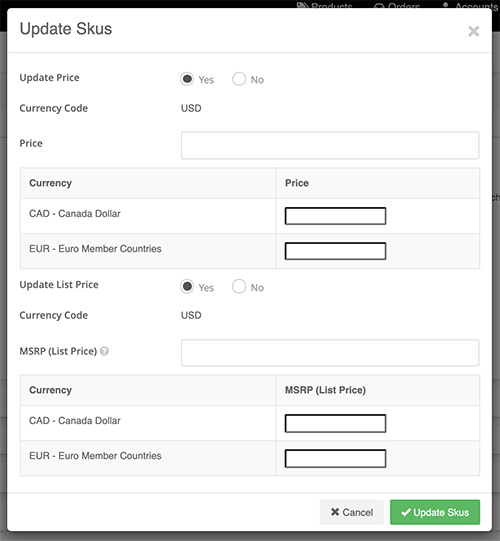
Update Skus
Select this from the Actions drop-down to update the Price and List Price for the Skus generated. Note that using this will change every sku's price. So, if the skus for the product need unique prices, change the prices via the Skus tab.
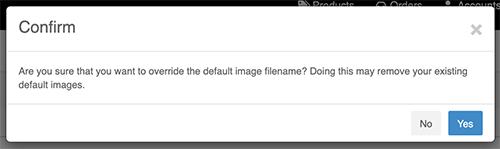
Reset Default Image Filenames
Select this from the Actions drop-down if the default filename was overwritten and now you would like to revert to the default filename which is just filename
Add Option Group
Select this from the Actions drop-down if you would like to add an option group. This will add the options for the group to the existing skus and may create additional skus.
Add Option
Select this from the Actions drop-down if you would like to add another sku from the available option groups.
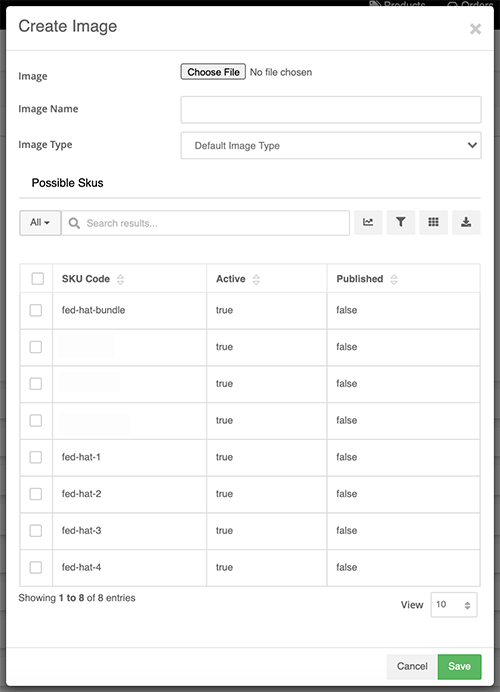
Add Image
Select this from the Actions drop-down if you would like to add an image. This will be added to the Images tab.
Add File
Select this from the Actions drop-down if you would like to add a file. This will be added to the Files tab.
Add Comment
Select this from the Actions drop-down to add a comment. This comment will be added to the Comments tab.
Actions Menu
The actions menu is a shortcut menu for commonly used actions.
Update Calculated Properties
This allows for the update of properties that are happening in the background, such as inventory transactions from another system, that are updated in Ultra Commerce once a day to be updated sooner. If there are lots of transactions such as orders then using the Update Calculated Properties feature would allow for a more accurate snapshot of inventory at a point in time.
Select this from the Actions drop-down to update Calculated Properties.
Update Skus
Select this from the Actions drop-down to update the Price and List Price for the Skus generated. Note that using this will change every sku's price. So, if the skus for the product need unique prices, change the prices via the Skus tab.
Reset Default Image Filenames
Select this from the Actions drop-down if the default filename was overwritten and now you would like to revert to the default filename which is just filename
Add Option Group
Select this from the Actions drop-down if you would like to add an option group. This will add the options for the group to the existing skus and may create additional skus.
Add Option
Select this from the Actions drop-down if you would like to add another sku from the available option groups.
Add Image
Select this from the Actions drop-down if you would like to add an image. This will be added to the Images tab.
Add File
Select this from the Actions drop-down if you would like to add a file. This will be added to the Files tab.
Add Comment
Select this from the Actions drop-down to add a comment. This comment will be added to the Comments tab.