Carts Listing
The Carts listing is where you can create a new sales order, or if you stepped away from your cart before placing it, you can view or edit it.
- Create a New Sales Order
- Order detail Basic fields
- Order Items tab
- Actions Menu Carts and Quotes
Create a New Sales Order
Administrators and customer support representatives do not have to go through the front-end to place a new order for a customer. Instead, all functionality, including assigning price groupings and promotions to an order, can be performed from within Ultra Commerce.
Access the Carts & Quotes Listing screen:
- Select Orders from the Ultra Commerce navbar.
- Select Carts & Quotes from the dropdown.
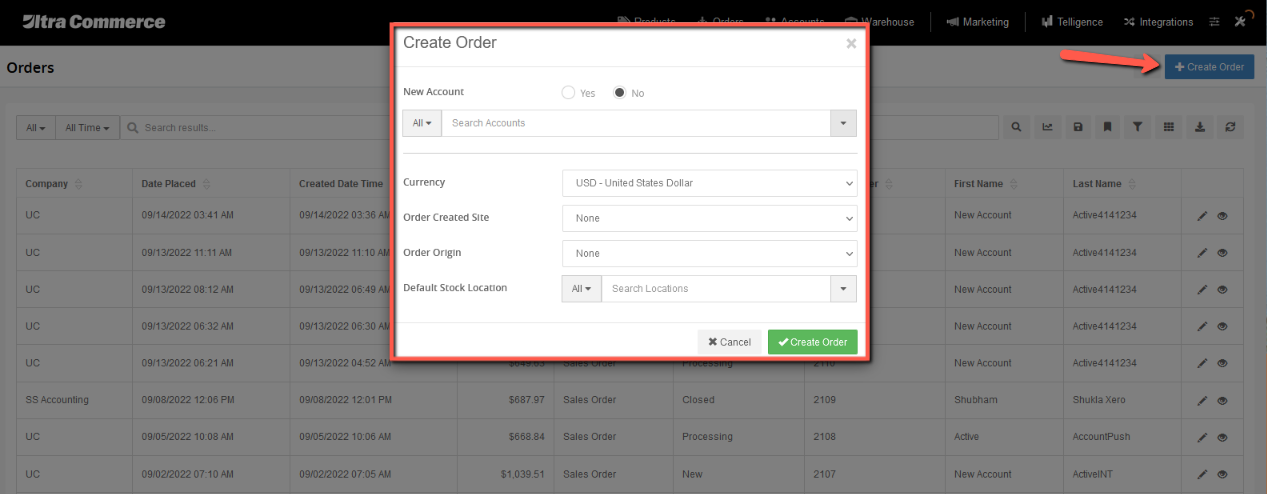
- Click +Create Order in the upper right hand corner of the screen.
The Create Order modal will appear with the New Account field set to Yes by default.
Create Order with a New Account

On the New Account field:
- Keep this field set to Yes
- Fill in the First Name, Last Name, Company, Phone, Email Address and Confirm Address fields.
Create Password for the new account
Some accounts are guest accounts and the account does not have a password associated with it.
If you would like the Account to be a member or "non-guest" account you will want to add a password for the account.
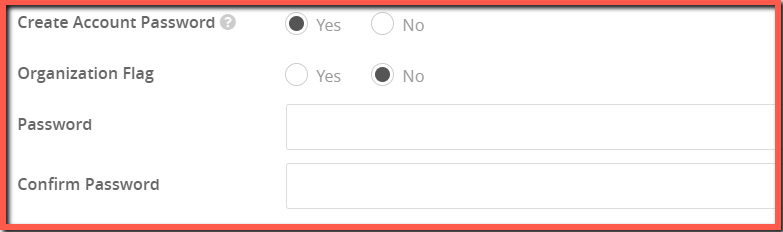
Create Account Password to create a non-guest account
- Set the Create Account Password field to Yes. If you leave this field set to No, the account will be a guest account.
- Create a Password and then Confirm the Password.
Create Order with Existing Account
If the order is being created with an existing account, you can search for the account in the Account field. To do so:
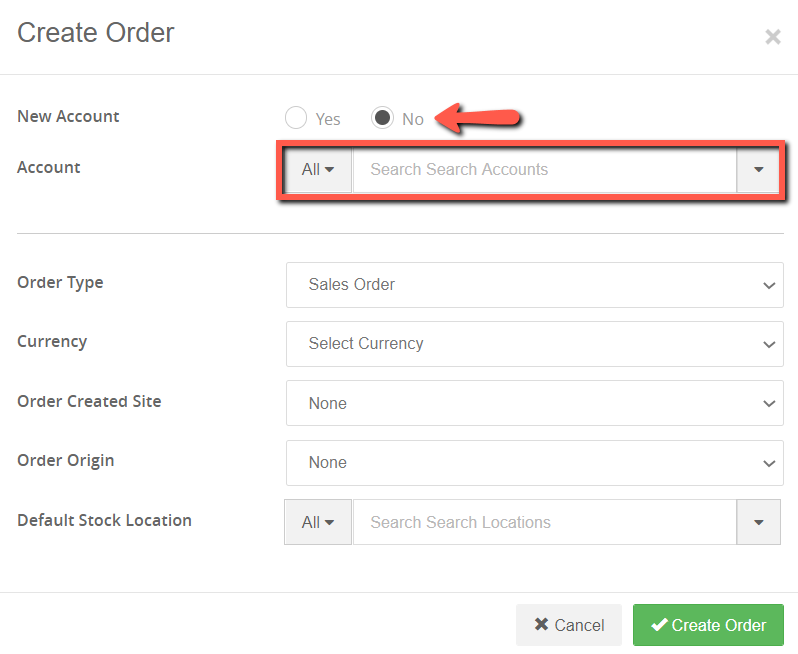
New Account field
- Select No
- In the Account field, begin typing the name registered on the account. Suggestions will be automatically generated in a drop-down,
- Select the appropriate account by clicking on it.
Now select from the following drop-downs:
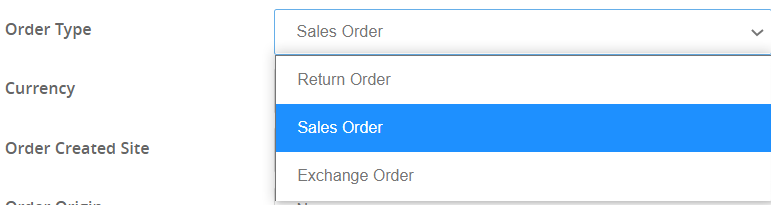
- Select Sales Order from the choices of Sales Order, Return Order, or Exchange Order. Order Types available for Orders are set within the Types section of Ultra Commerce. For more information see the Types section of the user guide.
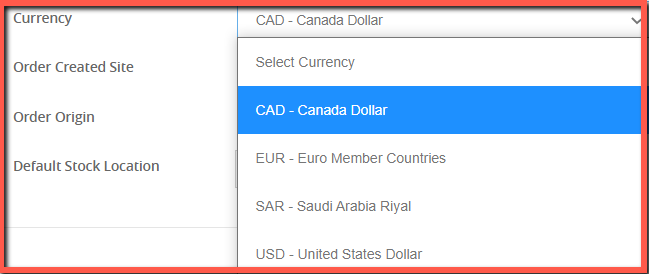
Set the Currency from the drop-down:
- Select the currency for the order. Currencies available / active for the order are determined in the Currency section of Ultra Commerce. For more information visit the Currencies section of the user guide.
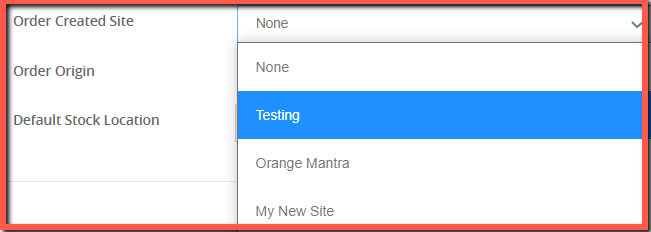
Set the Order Created Site from the drop-down:
- Select the Site from the drop-down. Sites available for the order are determined in the Sites section of Ultra Commerce. For more information visit the Sites section of the user guide.
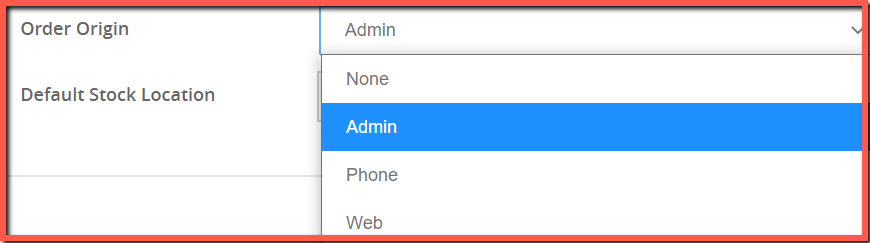
Set the Order Origin from the drop-down:
- Choose either Web, POS, and Mail Order. Order Origins available for Orders are determined in the Order Origins section of Ultra Commerce. For more information visit the Order Origins section of the user guide.
Set the Default Stock Location from the drop-down :
- Choose the default stock location that the skus for the order will be selected from. If no stock location is set, skus from all locations will display. Locations available for Orders are created in the Locations section of Ultra Commerce. For more information visit the Locations section of the user guide.

Once the fields are set for the Order:
- Click Create Order at the bottom of the modal.
Once the information is filled out on the Create Order Modal and Create Order has been clicked, Ultra Commerce displays the Order detail screen.
*Note - If you were to stop at this point before placing the order and leave Ultra Commerce, this Order would be considered an open Cart & Quote and you would find it in the Carts & Quotes listing section of Ultra Commerce. See the Carts & Quotes section of the user guide for more information.
Order Detail Basic fields
At the top left half of the screen is the information we inserted via the Create Order Modal. On the top right half of the screen is the overview, status and payments so far for the order.

Add an Assigned Account to the order
There is an additional field called Assigned Account which is a way to assign orders to a specific customer service agent.
- Type the name of the desired account in the typeahead
- Select the desired assigned account from the drop-down that appears.

Order detail Tabs
Below the Basic fields information are tabs that can be expanded to add additional information. The Order Items tab at the top is open by default but has been closed to more easily view all the tabs.
.png)
Order Items Tab
This is where items can be added to an order and where the items that have already been added appear.
Add Order Items to the Sales Order
In the screenshot below the Order Items tab of the order detail is expanded and the Add Sku tab is selected by default - in the top left corner of the order items tab as in the screenshot below. We will be keeping the tab set to Add Sku.
*Note - There are also Add Stock, Add Return Stock and Add Return Sku tabs.
Add Stock is used when you are selecting a Sku based on a specific location like when a customer is ordering from a store.
Add Return Stock would be used if a customer wanted to return an item to a specific store that might be different from the original sales order.
Add Return Sku is used for returns without indicating a specific location - it would be based upon the location in the original order.
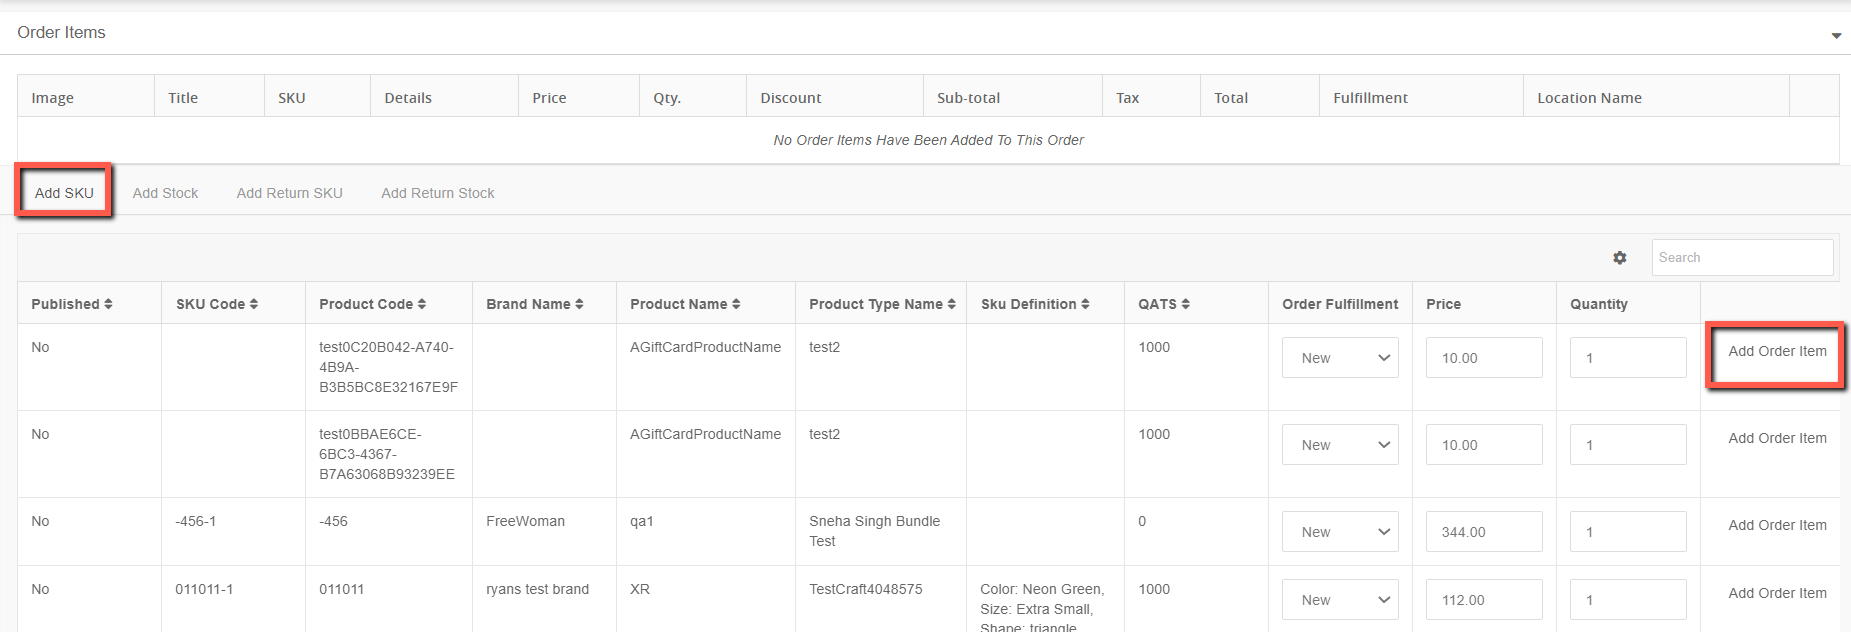
If you know what sku will be added to the order, the Search field can be used to narrow the Skus that are displayed.
Start adding items to the order:
- Find the order item desired either by clicking through the pages of skus, or by using the Search field.
- Type in the quantity in the Quantity field of the desired Sku.
- Click Add Order Item to the right of the order item.
After Add Order Item is clicked, the Add order items modal appears. This modal will vary depending on the product type of the sku that you add.
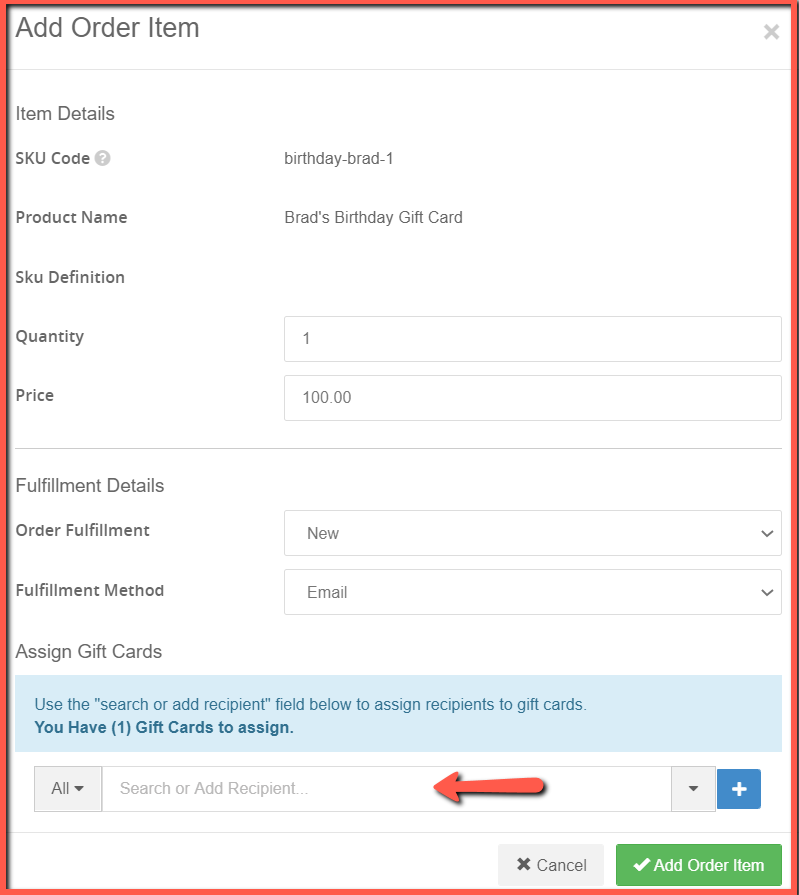
Add Gift Card Order Item that has a set price
When a gift card is added, the Add Order Item modal appears.
- Fill in the Quantity.
- Verify the Price. For a gift card that was created with a defined price.
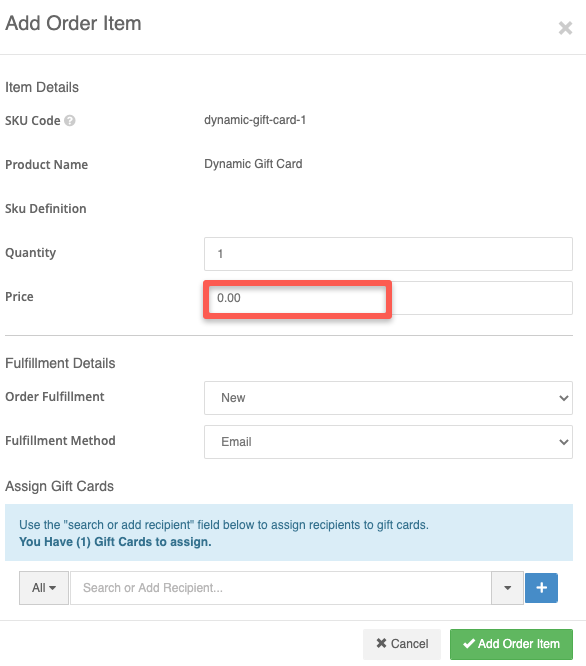
Add Gift Card order item that allows the user to define the price.
Be sure to select a gift card order item that had price set to 0.00 and the user defined price for the sku set to Yes.
Check out the Gift Cards Products section of the user guide for information on setting up dynamic gift cards.
On the Add Order Item modal:
- Change the price in the Price field from 0.00 to the desired amount.
Now it is time to select a fulfillment method on the Place Order modal.
Select Email Fulfillment
- The Fulfillment Method dropdown for a gift card most likely would be Email, although it is possible to have Shipping or Pick-up set as an eligible fulfillment method for gift card product types so that a physical card could be mailed or picked up in person at a retail location.
Assign Gift Cards field
The Assign Gift Cards field is where an existing account can be searched and assigned using the typeahead search box or a New Recipient can be added if they do not have an account.
*Note: The requirement to have a recipient assigned to a Gift Card product is controlled by a Sku Setting called Require Sku Gift Card Recipient. Like all settings, it can be set globally and inherited, or it can be set at the Product/Sku level. More information can be found Sku Settings for Gift Card products. In our example here, the setting is set to Yes. So, the person purchasing the gift card would be required to assign the card.
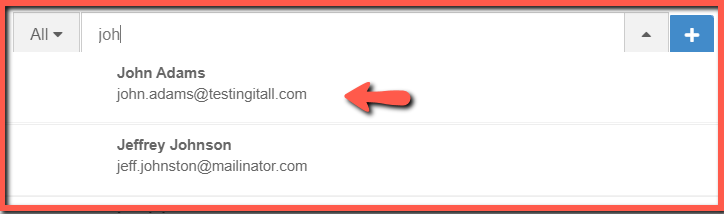
Assign Gift card to and existing account:
- Start typing in the search box
- Select the existing account desired from the dropdown.
The Account will appear as an entry below Assign Gift Cards.
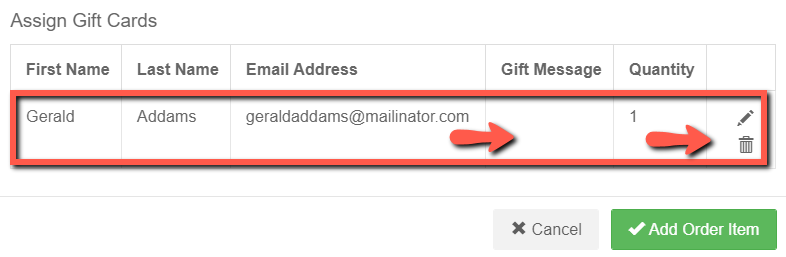
There will be the option to leave a Gift Message by:
- Clicking the edit pencil icon to the right of the recipient entry as shown in the screenshot above.
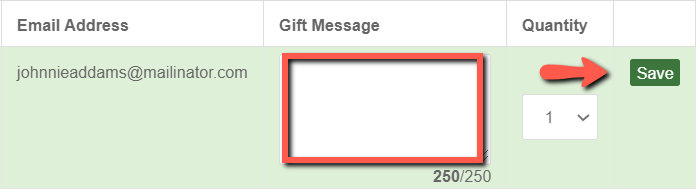
- Write the message in Gift Message field..
- Click the green Save button to the right of the entry.
- Click Add Order Item to save the order item to the order.
Assign Gift Card to new recipient:
You can also create a New Recipient if the recipient does not have an account already.
- Click the Blue + sign to the right of the search box if you would like to create a new recipient who doesn't have an existing account.
The Create Recipient fields will appear.
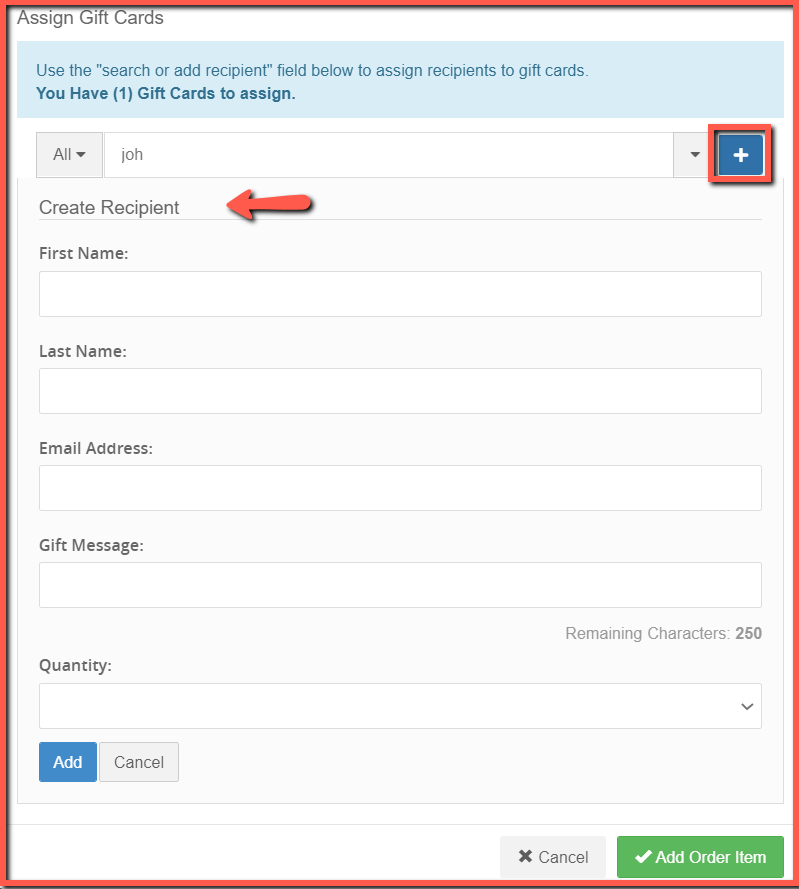
- Fill in the Create Recipient fields: First Name, Last Name, Email Address, Gift Message and Quantity Field.
- Click the Blue Add button at the bottom of the Create Recipient modal.
- Click the green Add Order Item button.
The Order Item will now appear on the Order Items tab.

Add Merchandise Product/Bundle Product order item
If you are adding an order item that is a Merchandise product or Bundle Product:
From the Add Order Item modal:
- Verify the quantity and price.
- Select the Fulfillment Method from the drop-down. For a physical product this will be Shipping or Pick-up.
- Select the Location from the drop-down to get stock from a specific store or warehouse. This will be pre-selected from the Order creation step.
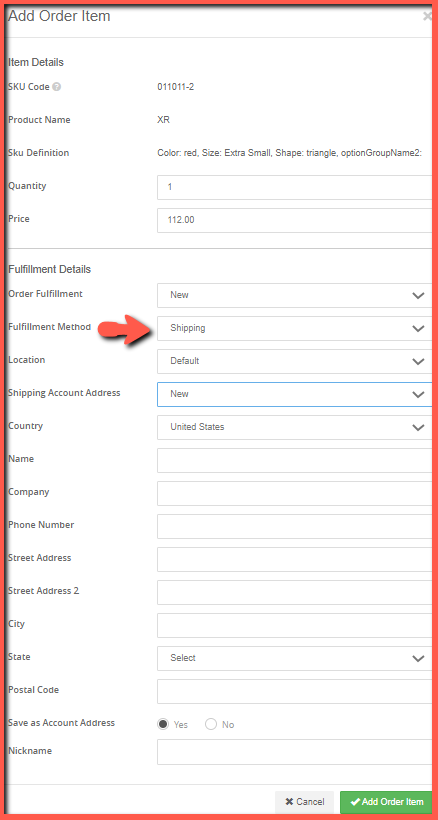
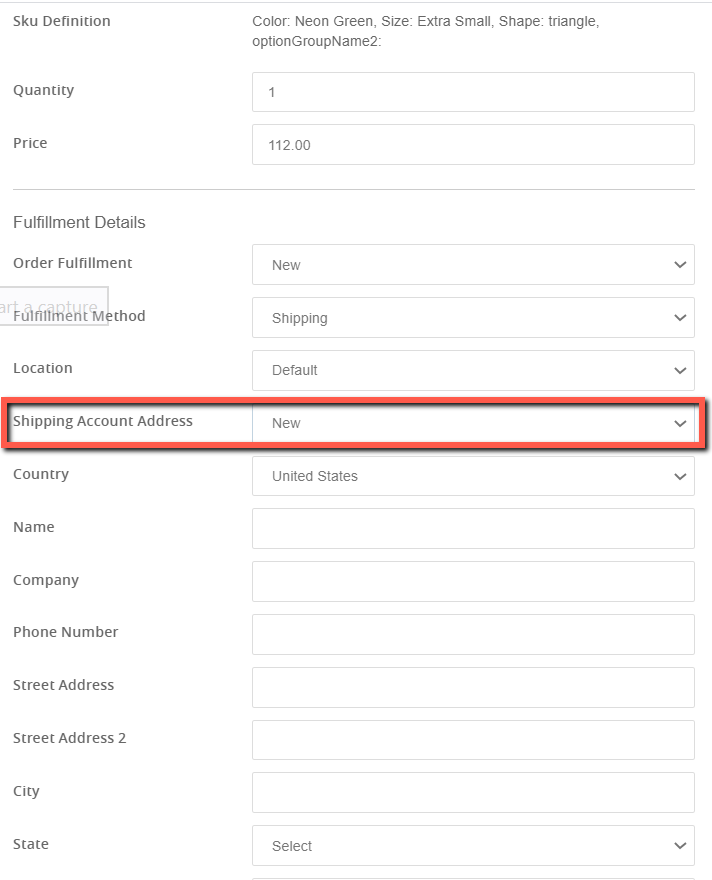
For Shipping fulfillment:
- Select Shipping from the Fulfillment Method dropdown.
- Select the Shipping Account Address. If a shipping address is tied to this account already and this is the address desired, select it from the Shipping Account Address drop-down.
Add Shipping Address
- If you would like to add a new shipping address, select New from the Shipping Account Address dropdown.
- Save as Account Address - Yes or No. If you choose to save the Account address, it will be saved and appear in the dropdown for future orders.
- Add a Nickname in the field if you selected Yes for the Save as Account Address field.
- Click Add Order Item.
For Pick-Up fulfillment:
From the Add Order Item modal:
- Select Pickup from the Fulfillment Method dropdown.
- Set the Pickup Location.
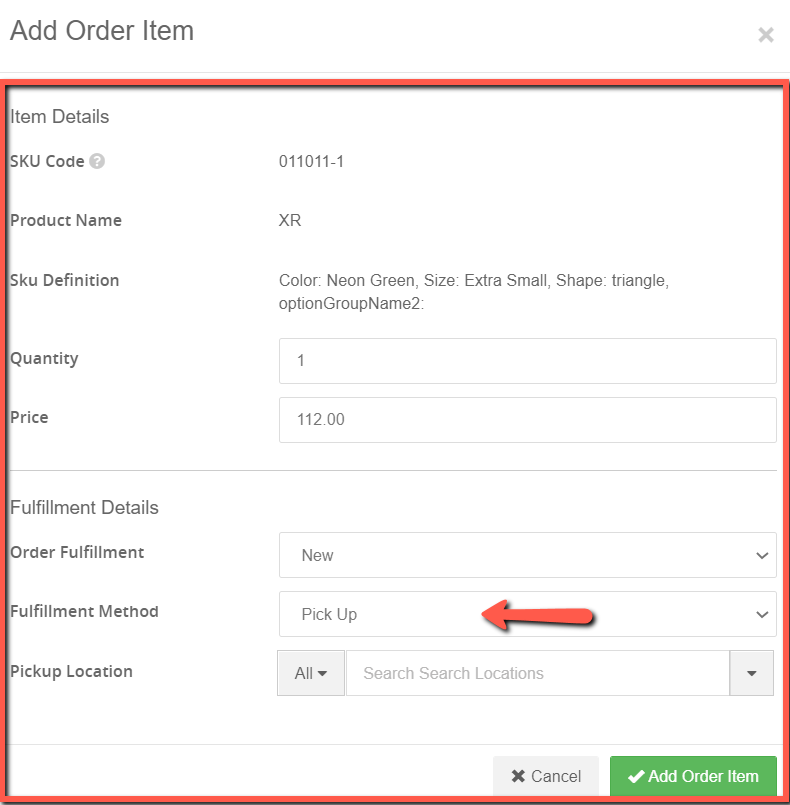
After all the fields have been filled:
- Click Add Order Item at the bottom of the modal.
Add Event Order Item
If an Event is added to an order, the Add Order Item modal has some unique fields that need to be filled.
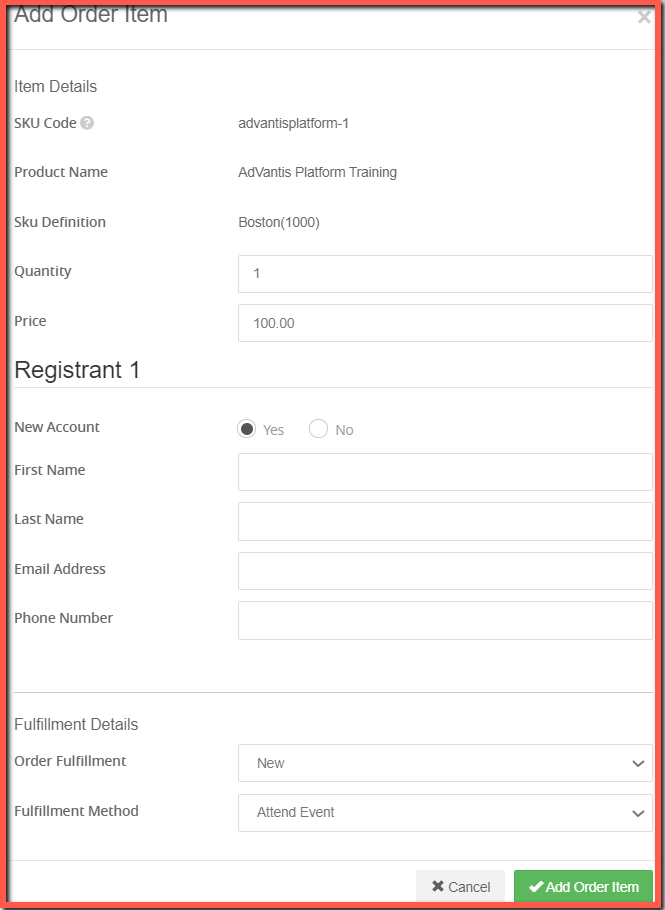
- Verify the Quantity and Price.
Fill in the Registrant details fields:
- Select New Account Yes or No.
- If the Account already exists select No and find the Account in the search box.
- If the Account is New, select Yes, and fill in the First Name, Last Name, Email and Phone fields for the Registrant.
Fulfillment Method Attend Event
- Set the Fulfillment Method to Attend Event. This is a unique fulfillment method for Event Products.
- Click Add Order Item to add the item to the order.
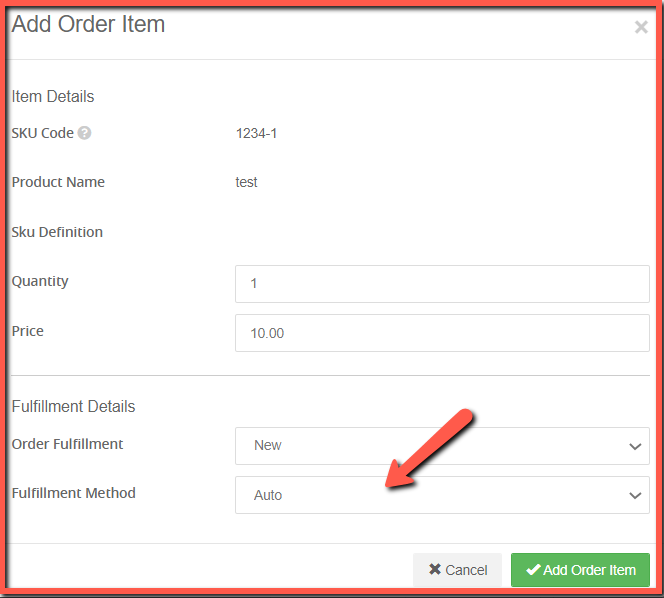
- Verify the Quantity and Price.
Auto Fulfillment Method
- The Fulfillment Method will be set to Auto.
- Click Add Order Item.
Add Subscription Order item
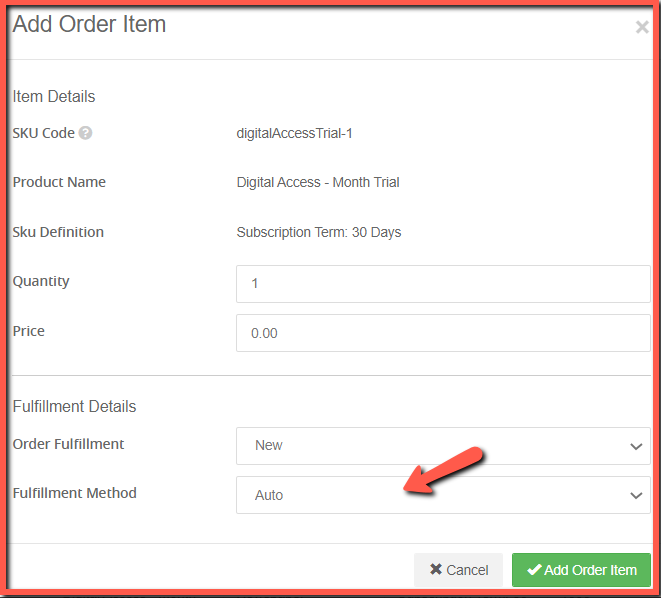
- Verify the Quantity and Price.
Set Fulfillment Method Auto or Shipping
- The eligible Fulfillment Method will be set to Auto or Shipping.
- Click Add Order Item.
Actions Menu - Carts and Quotes
Below is a quick overview of all the items on the Actions menu, saving Place Order for last.
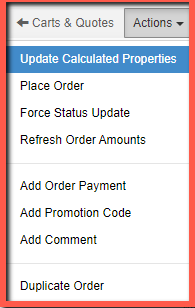
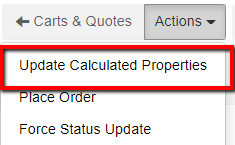
Update Calculated Properties
Force Status Update
Refresh Order Amounts
Add Order Payment
Add Promotion Code
Add Comment
Duplicate Order
Place the Order via Actions Menu
Orders can be placed with Cash, Charge, Gift Cards or Term Payment if the they are enabled for the account and the order.
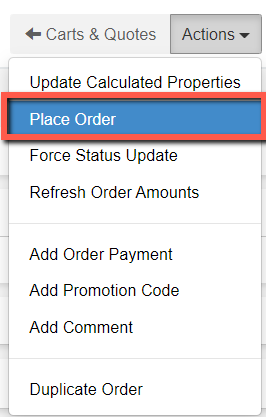
In order to place an Order:
- Click Actions Menu at the top of the Order detail.
- Select Place Order from the dropdown.
If there are stored credit card payment methods, this is what the place order modal will look like:

- If you select New from the Copy From field you will be able to select any payment method type - cash, term payment, gift card or credit card
.
- You will have the option to select the saved credit card payment by selecting Account Payment Method
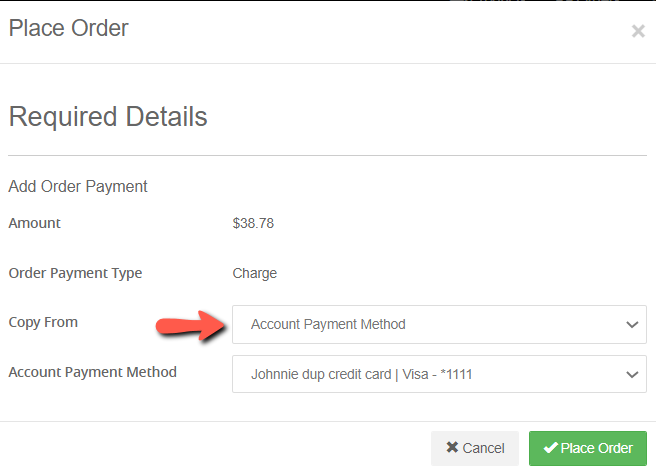
- You can use Previous Order Payment.- if there is a previous order this option will display.
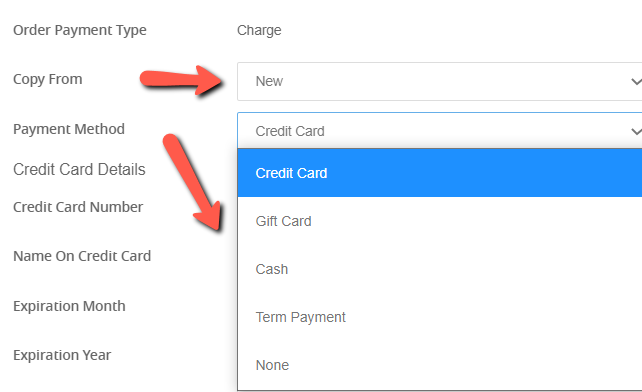
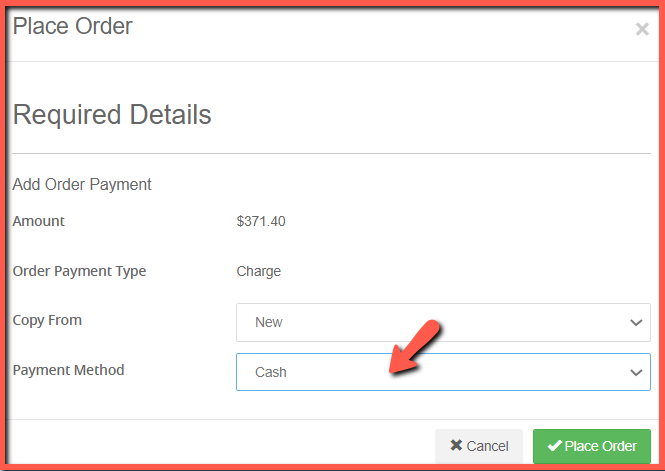
If there are no stored payment methods yet on the account, this is how the Place Order Modal will initially appear:
Use Cash to place the order
From the Place Order modal:
- Make sure Copy from is set to New so that the Payment Method dropdown displays.
- Select Cash from the Payment Method dropdown.
- Click Place Order.
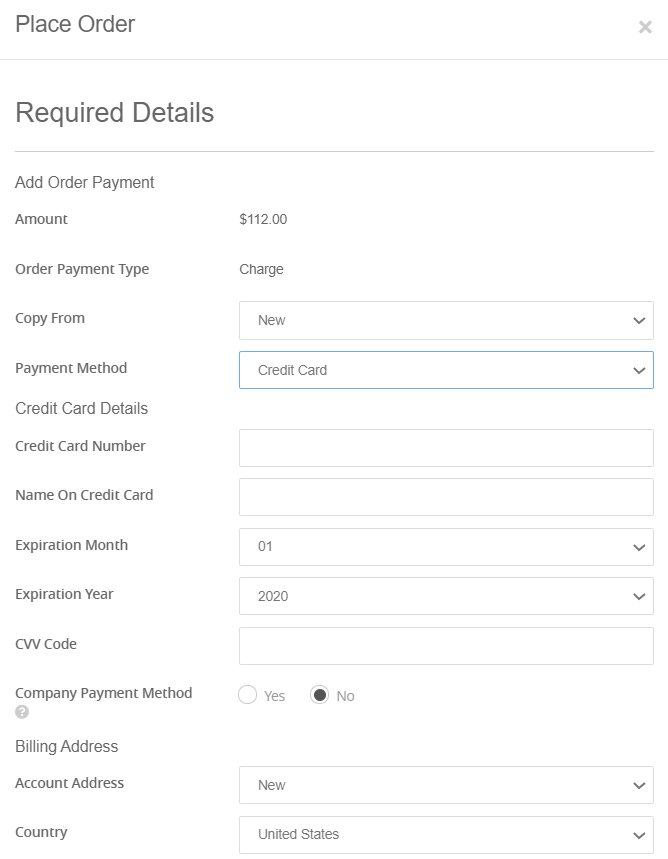
Place a Credit Card order with a New Credit Card and address
From the Place Order modal:
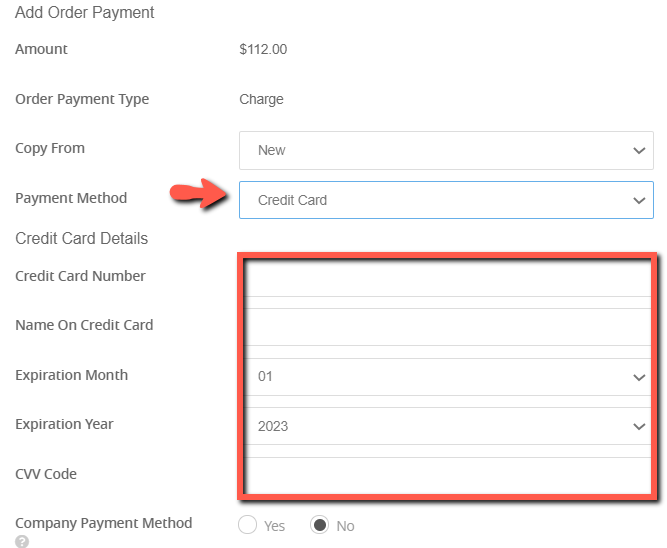
If there is no credit card already saved to the Account:
- Make sure Copy From field is set to New so that the Payment Method dropdown options display.
- Select Credit Card from the Payment Method dropdown.
- Fill in the Credit Card Number.
- Fill in the Name on the Credit Card.
- Add the Expiration Date.
- Add the CVV Code.
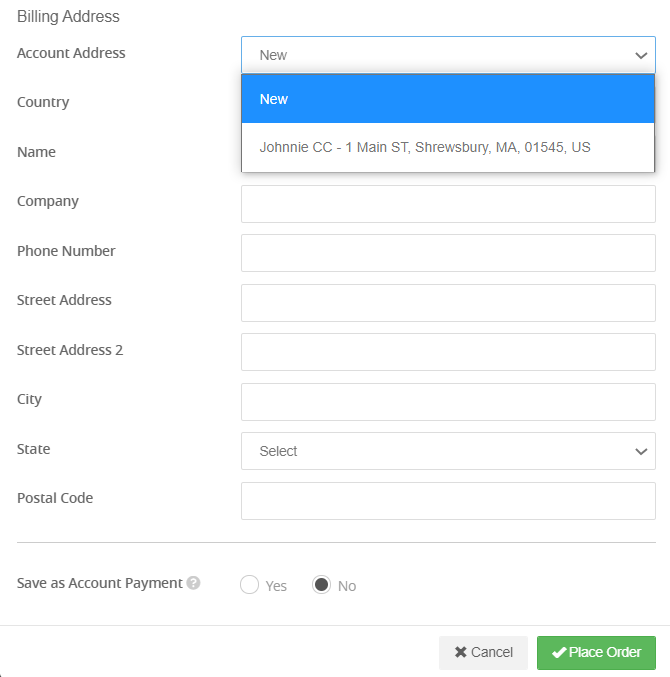
From the Billing Address section of the Place Order Modal:
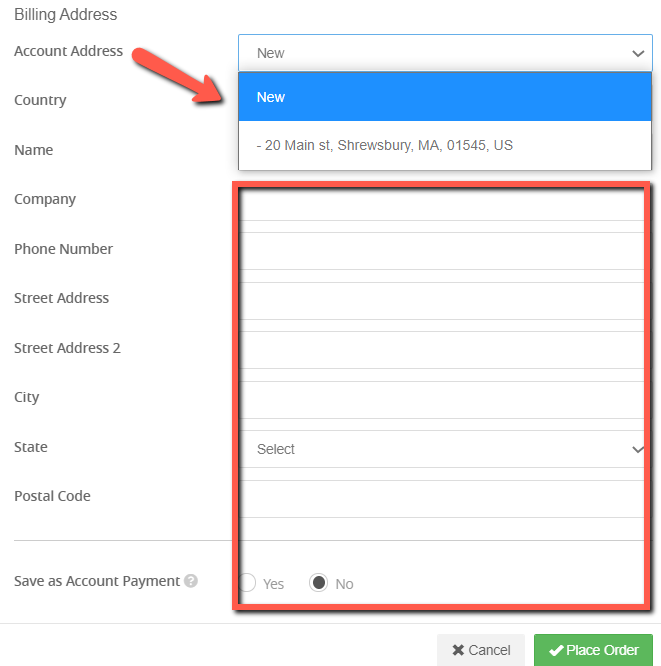
- From the Account Address dropdown select either New or an Existing address option. If you select New, fill in the address form fields. If you select an existing address, these fields will be automatically filled.
Save As Account Payment
- Select Yes or No for Save as Account Payment. Yes will save the payment to the account for use in future orders if you filled in a new credit card number in the step above.
- Click Place Order.
Use a Gift Card to place the order
From the Place Order Modal:
- Make sure Copy From field is set to New so that the Payment Method dropdown options display.
- Select Gift Card from the Payment Method drop-down.
.png)
- Select the Gift Card number from the Gift Card drop-down. If the account placing the order has a gift card associated with it because it was will be in this drop-down. If you don't have a card in this dropdown you can enter in the text field.
- Gift Card text field: If there is a gift card that has not been assigned to any account already, the card number can be added here. Ifthe gift card has been assigned to a different account, place the number here -however, be sure to select No on Redeem Gift Card to this account if it has already been assigned to a different account.
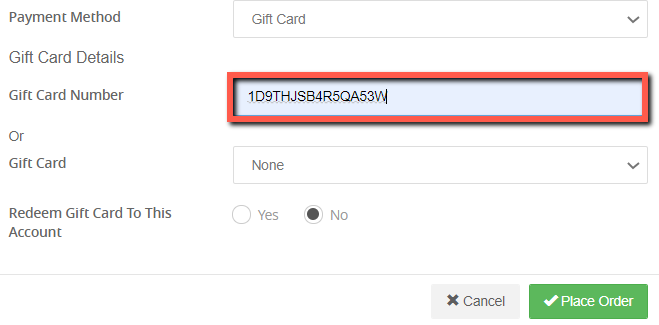
Redeem Gift Card to Account
- Redeem gift card to this account: This field is only set to Yes if you have a Gift Card that wasn't assigned to any account when ordered. (There is a setting Require Sku Gift Card Recipient that if it is set to Yes requires that a recipient is added when ordering a gift card.) If you are using a gift card that was already assigned to any account set this field to No.
*See Sku Setting Unique to Gift Cards of the user guide for information about creating gift card products that Require Sku Gift Card Recipient.
- Click Place Order.
Use Term Payment to place an order
For an order to be placed with Term Payment method it must be first enabled for the Account that is placing the order. For more information on this, visit the Account Overview - Account Settings section of the User Guide.
From the Place Order Modal:
- Make sure Copy From field is set to New so that the Payment Method dropdown options display.
- Select Term Payment from the Payment Method dropdown.
- Fill in the Purchase Order field.
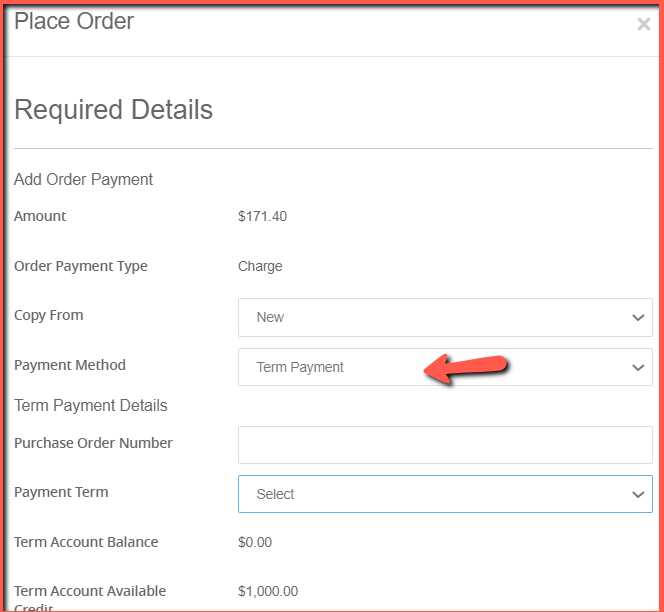
- Select the Payment Term from the dropdown, typically Net 30, Net 45, Net 60. This is another setting that can be enabled and fine-tuned in Account Settings.
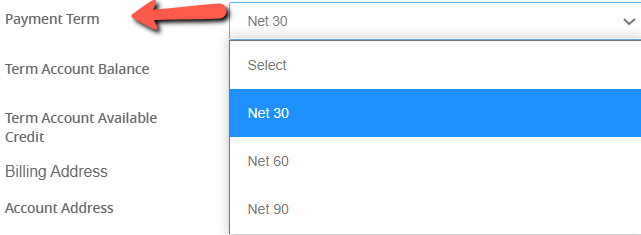
- Term Account Available Credit will be determined by the Term Limit for the Account, minus any outstanding term credit. More information on this can be found Term Payment tab of Accounts of the user guide.
On the Billing Address section of the Place Order modal for Term Payments:
- Select the Account Address either New or a previously saved address. Fill in the Address fields if a new address is being added.
- Save as an Account Payment is not necessary for Term Payment because the Account would already have the term payment method enabled. This is used for when new credit cards are entered.
- Click the Place Order button.
The Order will be placed and the order will now be found on the Orders listing page of the site.